Connect Models & Plans
ZCode supports multiple ways to access GLM models for coding workflows. For global users, we recommend using the Z.ai Coding Plan to run GLM-5.3 in ZCode with a simple account-based setup.
Recommended for global users
Sign in with your Z.ai account to use GLM models in ZCode. If your account has a GLM Coding Plan, ZCode uses the plan and quota from that account directly.
Connect Z.ai
Best for GLM-5.3 coding workflows, a simple account-based setup, and users who already have a GLM Coding Plan.
GLM Coding Plan (BigModel)
For users in China: subscribe via the BigModel open platform for the same GLM Coding Plan with a cost-effective AI coding experience.
The GLM Coding Plan has been relaunched. The new plans meter usage in credits and introduce a weekly usage limit; Pro and Max provide 6× and 14× the Lite usage allowance respectively. Once your account has an active plan, ZCode applies its quota directly. For how the new plans differ from legacy ones, see the Coding Plan Revision Notice.
Other ways to connect
Third-Party Providers
Connect compatible model services through the Anthropic / OpenAI protocols, including team-managed channels.
Use API Key
Connect model services with an API key if you manage your own model access.
Setup Entry Points
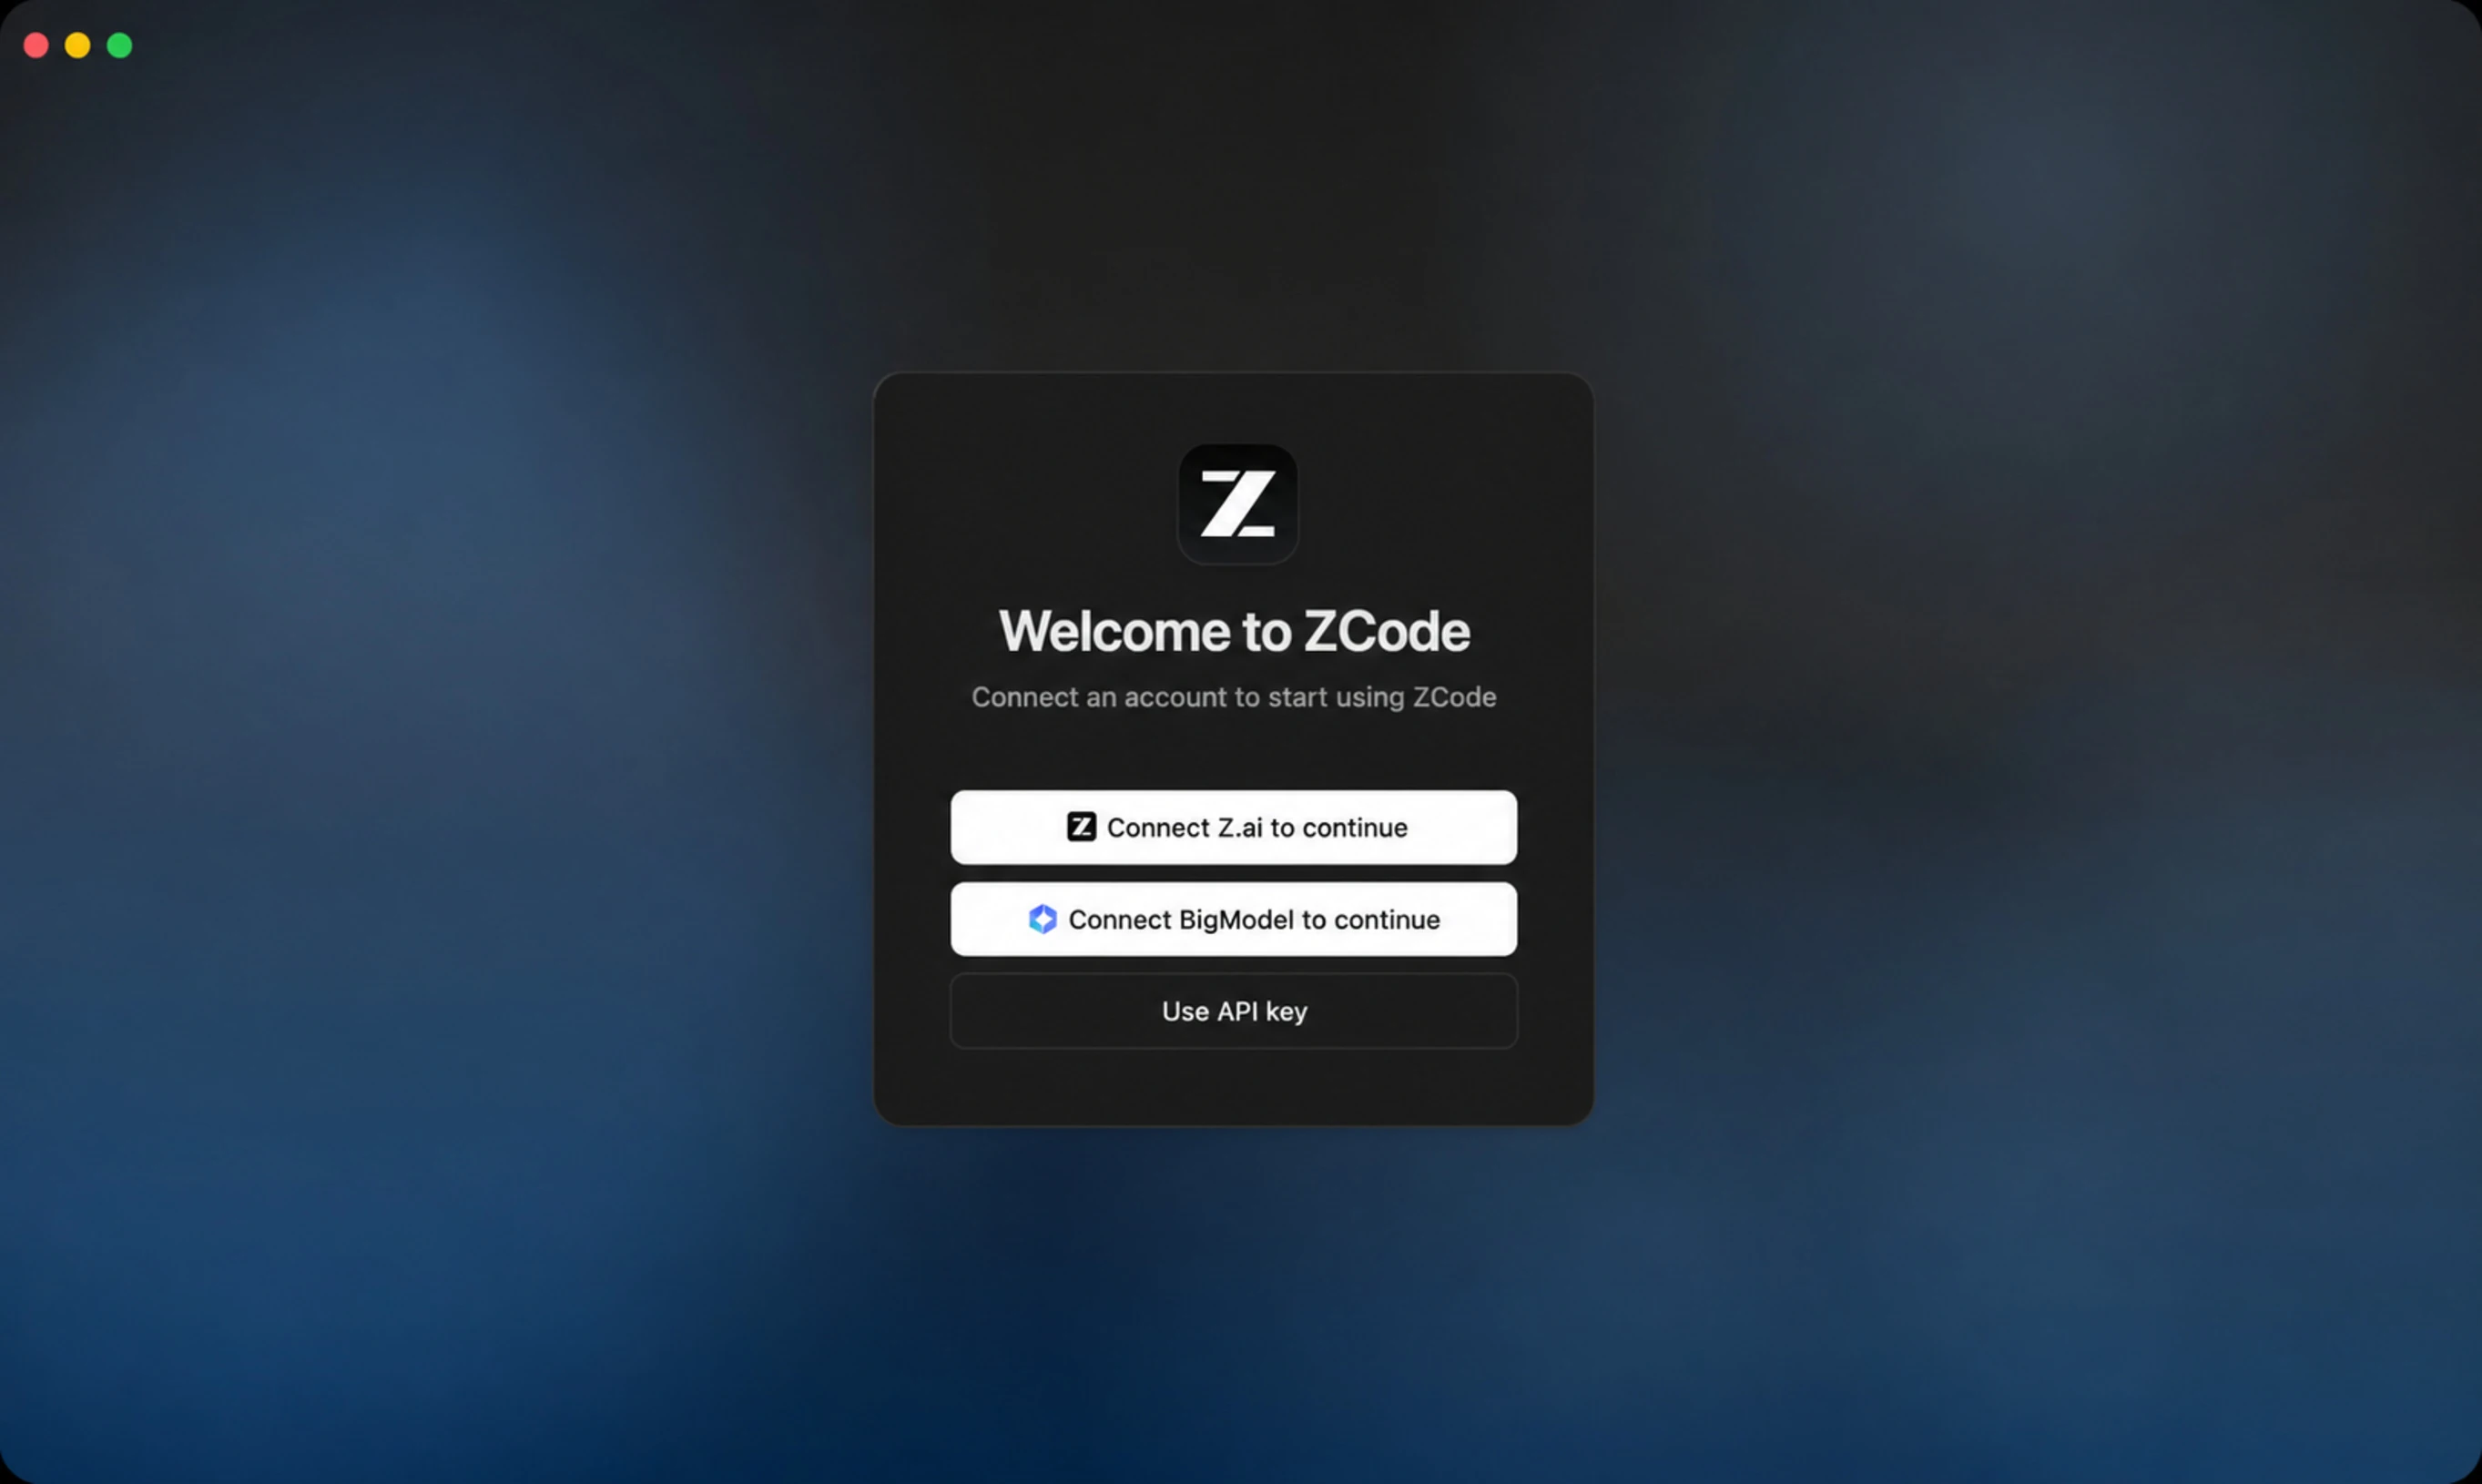
Method 1: First-Launch Welcome Screen
The first time you open ZCode without any usable model, the welcome screen offers connection options directly:
- Continue with Z.ai: authorize and sign in with a Z.ai account.
- Continue with BigModel: authorize and sign in with a Zhipu BigModel account.
- Use API Key: fill in an API Key directly and go to the model provider settings.
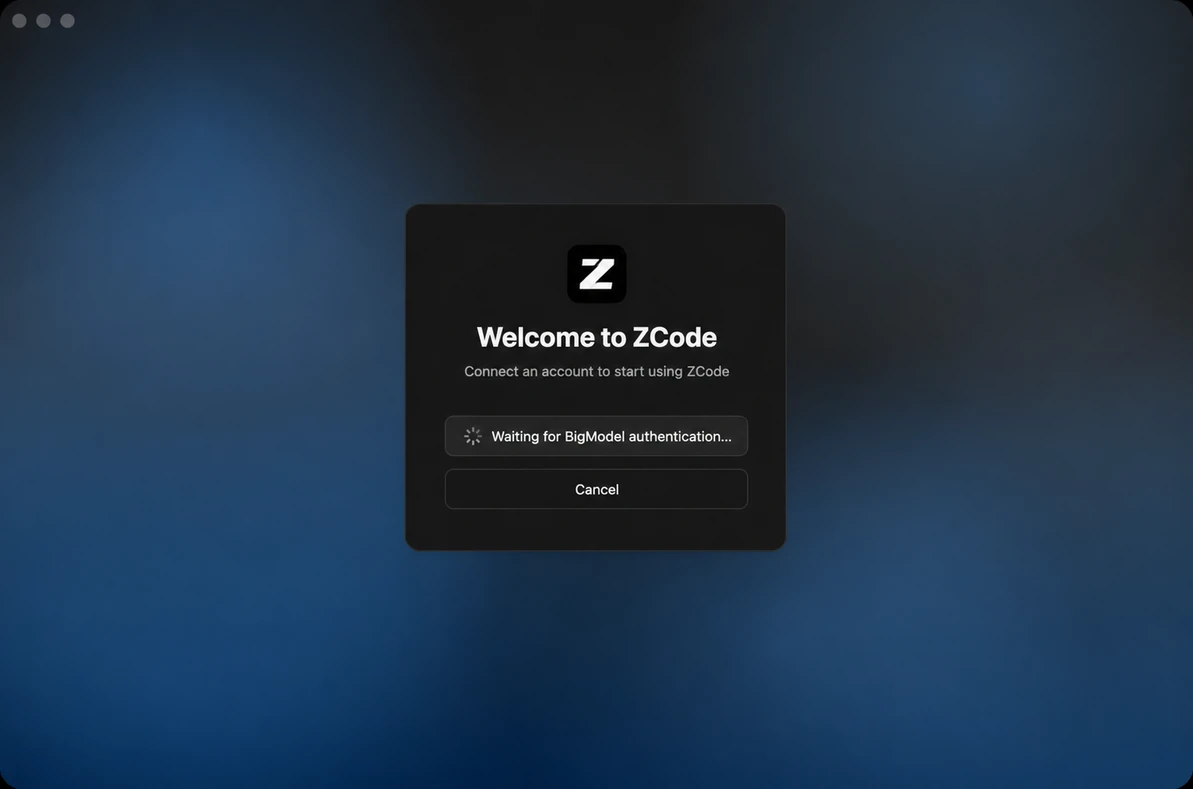
After you choose Continue with Z.ai or Continue with BigModel, ZCode opens the authorization flow and waits for the provider to finish authentication. Once authentication succeeds, the account is bound automatically.
Method 2: Model Selector
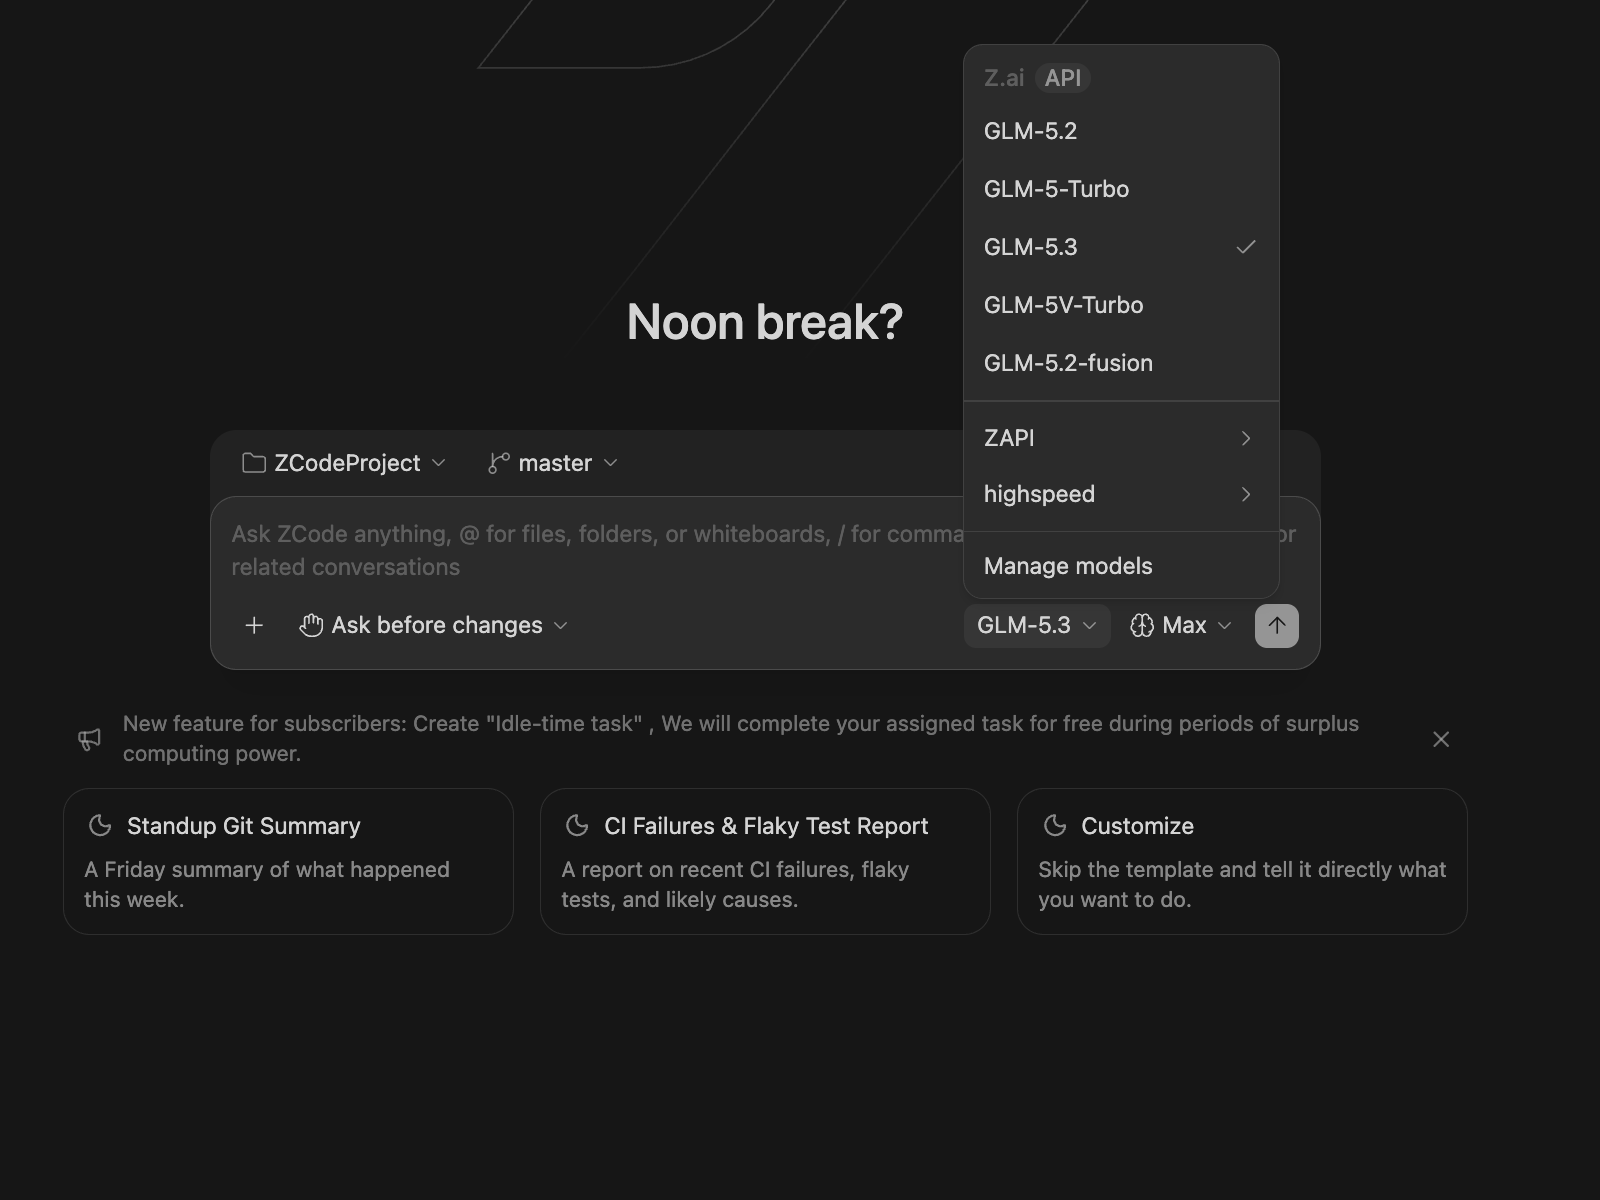
After entering ZCode, click the model name inside the chat box to open the model selector, then click Manage Models at the bottom of the list to open the Settings -> Model Settings panel, where you manage the model channels available to ZCode Agent.
BigModel / Z.ai API Endpoints
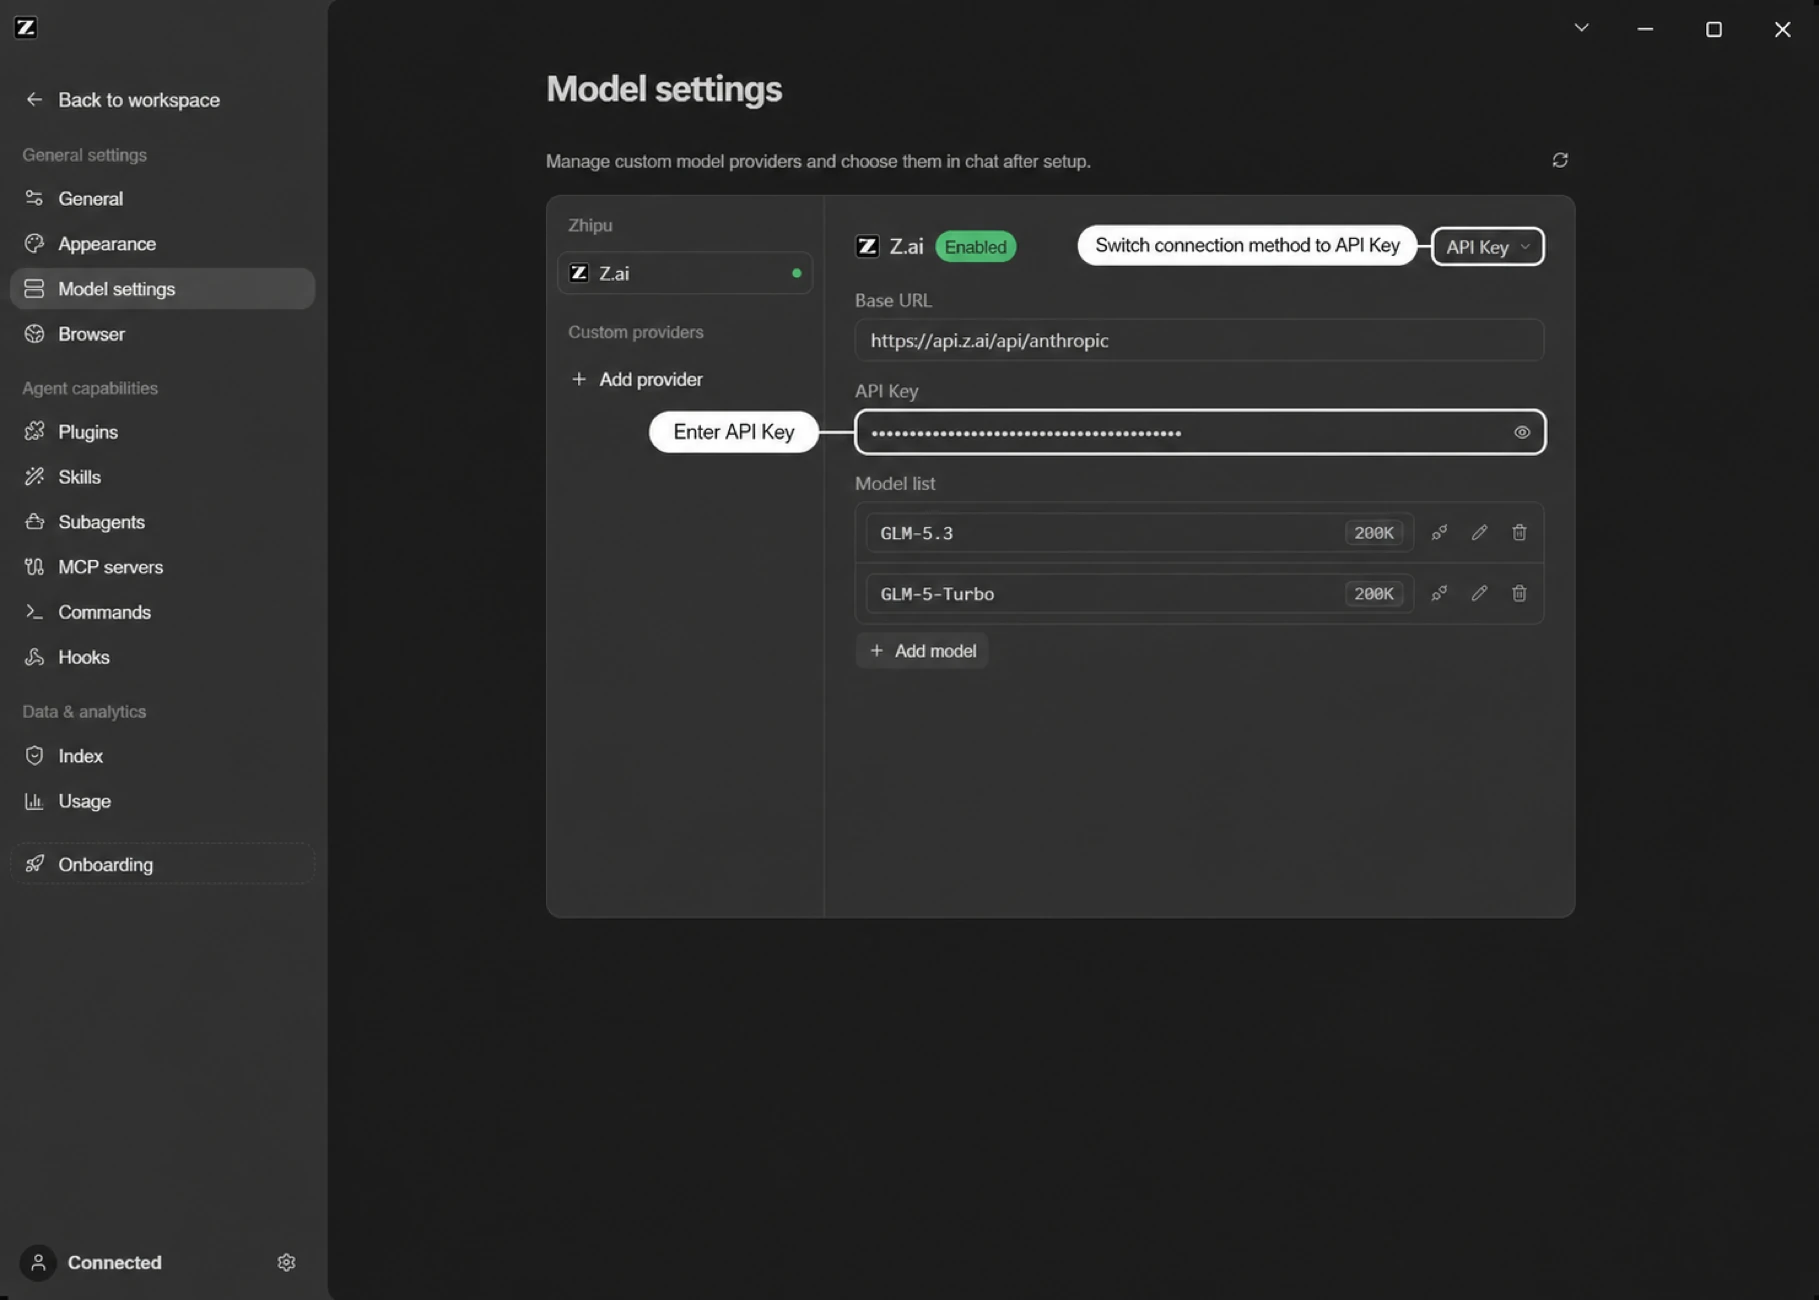
After switching BigModel or Z.ai to API Key mode, you will see an OpenAI Base URL and an Anthropic Base URL field. Pick your account type first, then fill in the URLs for the platform you use and add the matching API Key.
GLM Coding Plan
Most commonUse the quota from a Coding Plan subscription — coding scenarios only.
BigModel
Z.ai
Resource package / Prepaid balance
General API usage with model resource packages or prepaid balance — the OpenAI Base URL is all you need.
BigModel
Z.ai
Before you fill in
- For a Coding Plan, the OpenAI URL must be the Coding-only endpoint (
/api/coding/paas/v4), not the general endpoint/api/paas/v4. - The Coding endpoint is for coding scenarios only; it and the general endpoint are not interchangeable.
- If you bind your account through Coding Plan authorization (not API Key mode), ZCode routes requests automatically — no manual setup needed.
Connect BigModel
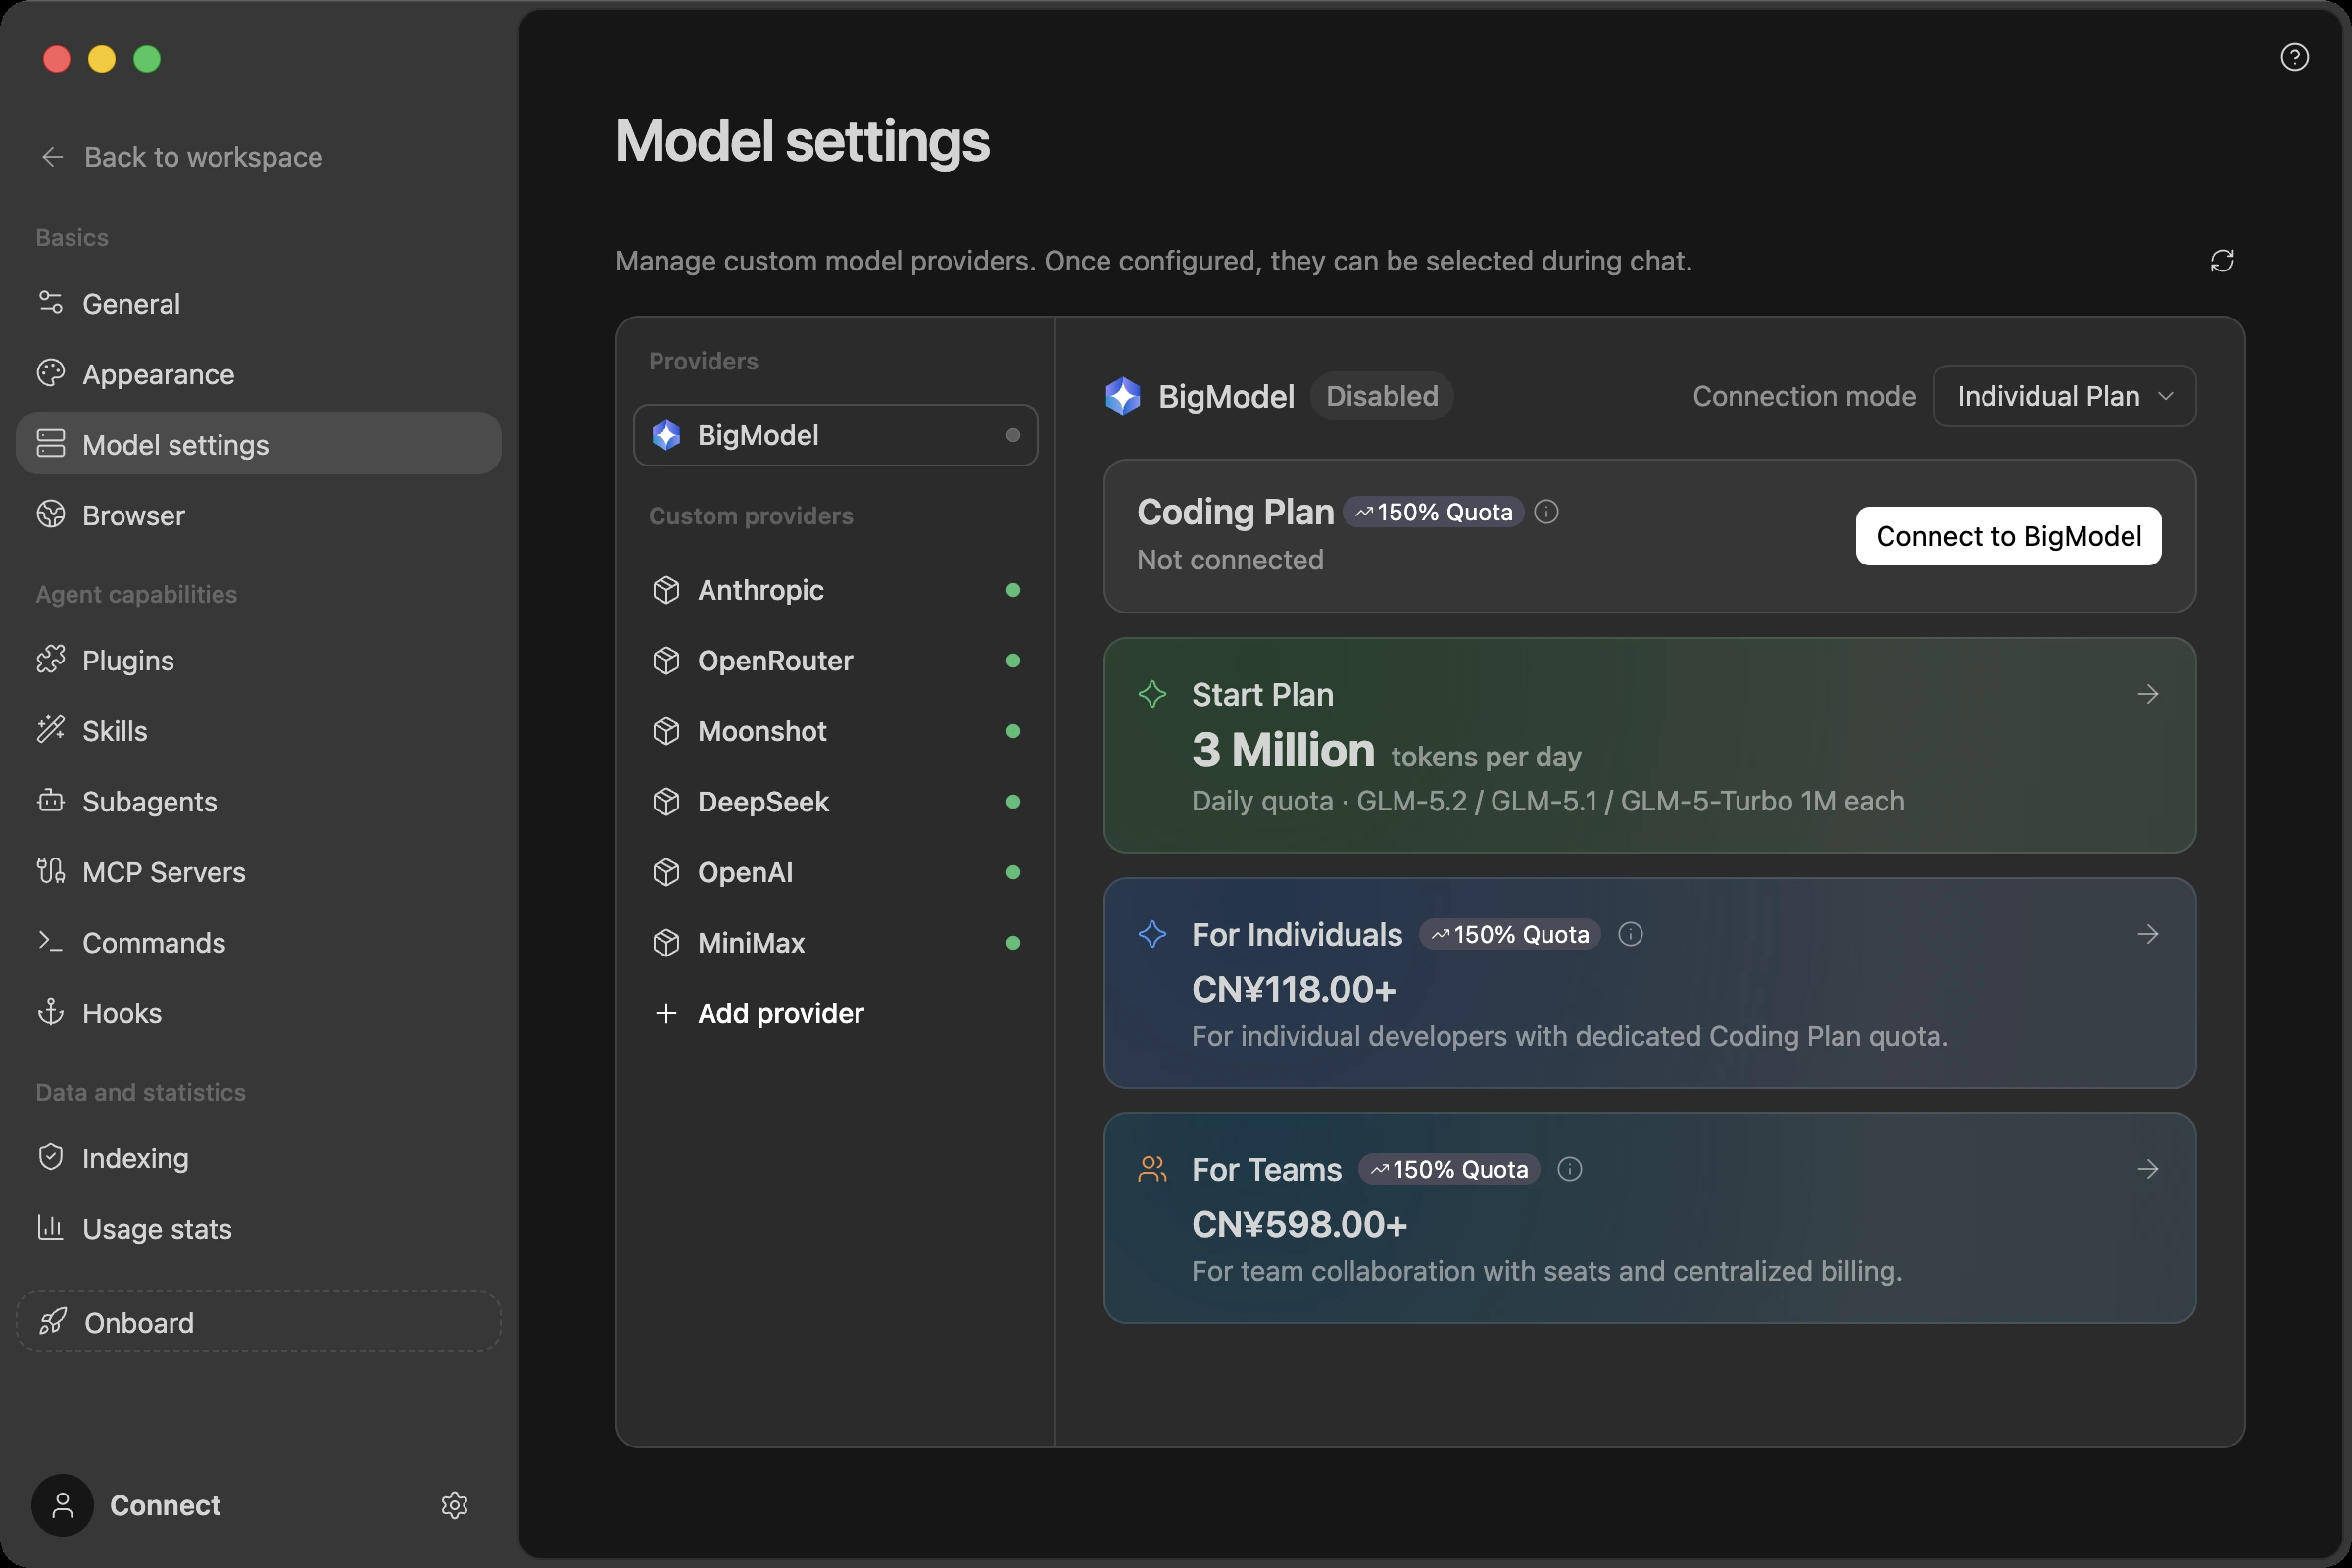
- Open the Model Settings panel through either method above
- Select BigModel from the provider list on the left
- Connect your account and turn on the enable switch to use built-in models such as GLM-5.3 and GLM-5.3-Flash according to your account permissions
- Use the switcher in the upper-right corner to choose a connection mode: bind a GLM Coding Plan via Coding Plan, or switch to API Key access
Free Trial Quota
New users automatically receive a trial plan after connecting a BigModel account: no payment required, with 8 million tokens per day for the first 5 days for GLM model trials. This is intended for trying ZCode Agent in real projects before deciding whether to upgrade to a GLM Coding Plan.
Note: the trial lasts 5 days only. The daily quota is granted during these 5 days and expires afterwards — it is not an ongoing daily allowance.
The daily trial quota is split across two model buckets. The provider page shows each model's remaining balance and today's usage in real time:
| Model | Daily trial quota |
|---|---|
| GLM-5.3 | 3 million tokens / day |
| GLM-5.3-Flash | 5 million tokens / day |
Quota refreshes daily during the trial period. Available models, remaining balance, and usage are subject to the real-time status shown on the BigModel provider page.
Subscribe to a Coding Plan Inside ZCode
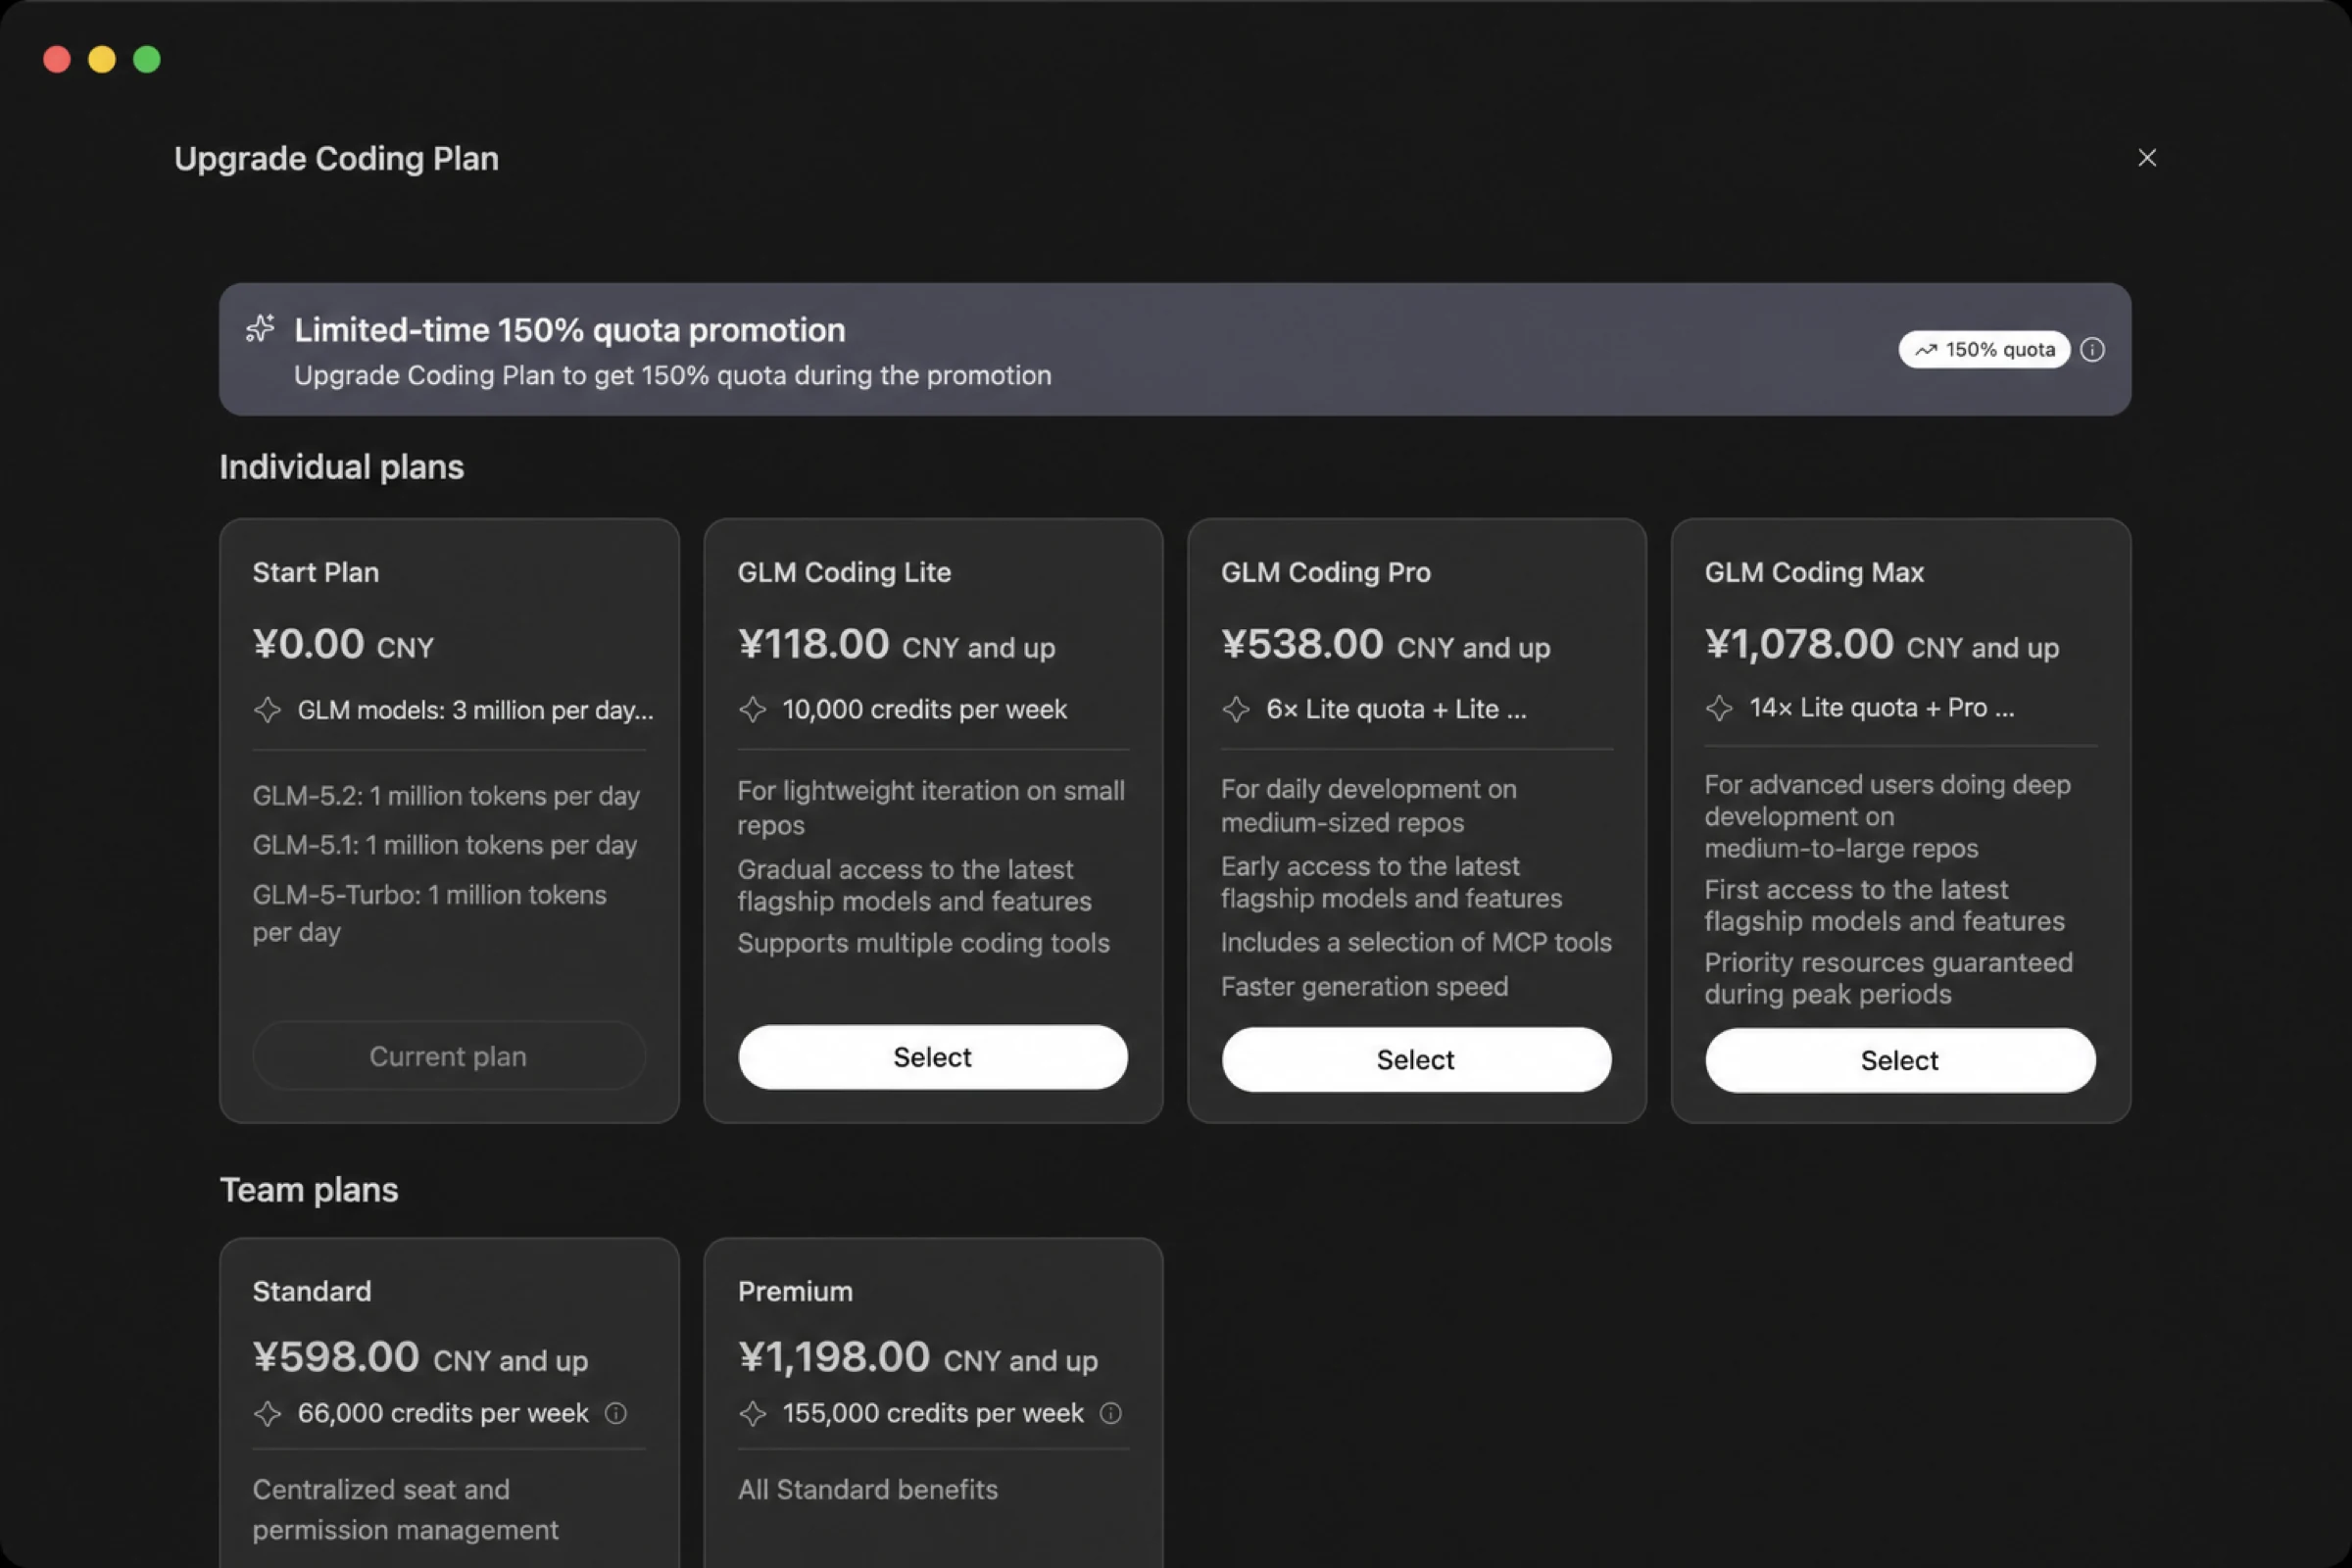
Need more than the trial quota? You don't have to leave ZCode: the BigModel provider page lists the GLM Coding plans (Lite / Pro / Max) with monthly, quarterly, and yearly billing, and you can complete the purchase in-app after signing in. Existing subscribers can also manage their current plan and check quota status here.
The new plans meter usage in credits and add a weekly allowance on top of the 5-hour one; for each tier's exact benefits, credit allowances, and conversion rules, refer to the BigModel Coding Plan Revision Notice. When you run out of quota, watch for reset opportunities in the app — see Quota Reset Cards.
Using a Team Plan
If your team has a GLM Coding Plan team subscription, no extra setup is needed once you sign in: the connection menu on the BigModel provider page lists each team you have access to as its own Team Plan entry, named after the organization. Select one to run tasks against that team's quota. The same menu switches back to your Individual Plan or an API key.
After switching, the quota shown in the sidebar and usage stats follows the selected connection, and quota cards indicate whether they're personal or team.
If a team entry appears but reports that no seat is assigned, your administrator hasn't added you yet — seat management happens on BigModel's team plan page, not in the client, and the page provides a direct link there.
Connect With an API Key
Choose the setup that matches your account type:
Option A: GLM Coding Plan (Coding Plan API Key)
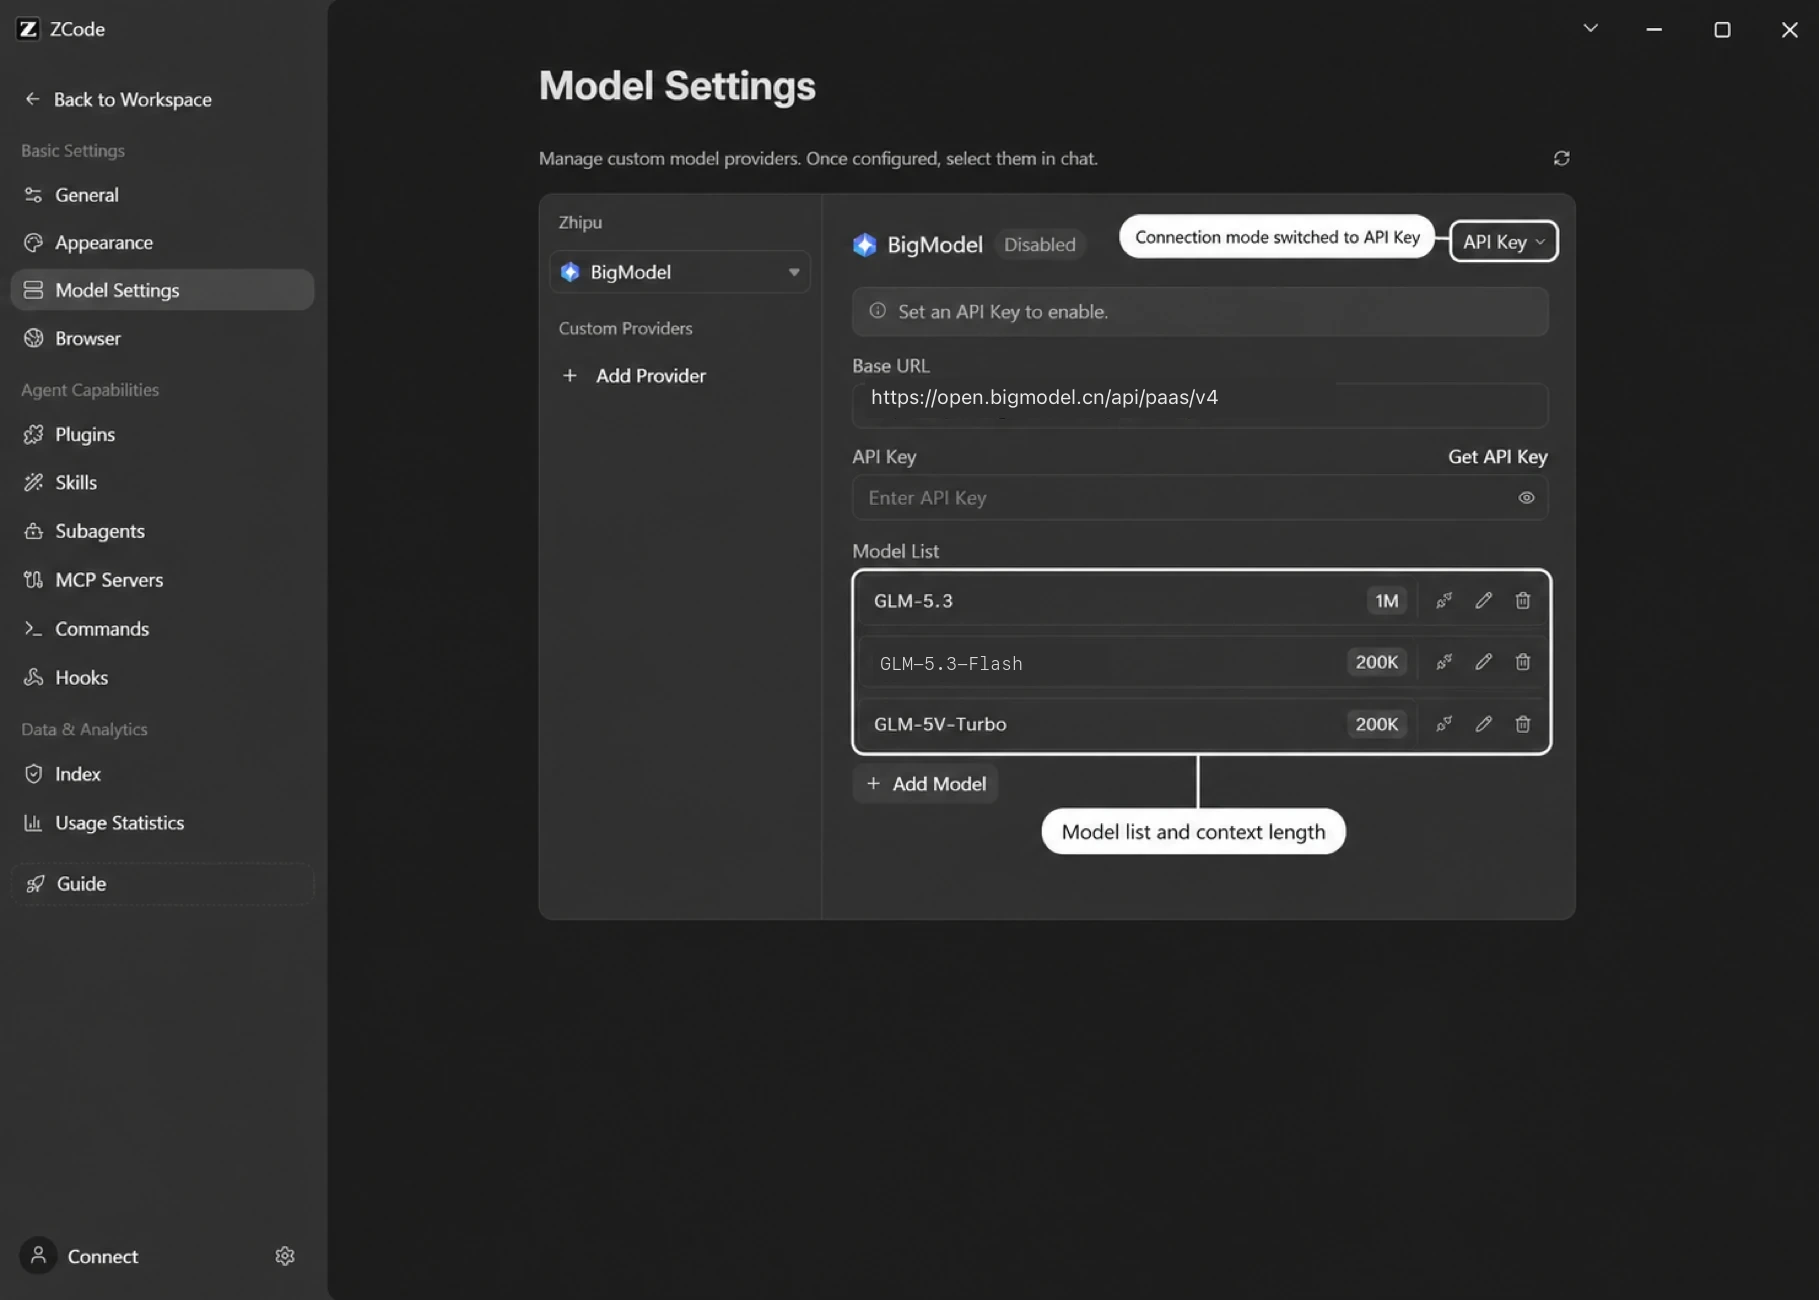
- In the upper-right corner of the BigModel provider page, switch the connection mode to API Key
- Set the OpenAI Base URL to the Coding-only endpoint:
https://open.bigmodel.cn/api/coding/paas/v4 - Fill in the API Key obtained from the Zhipu open platform
- Available models depend on your account permissions and the model list returned by the provider
Do not replace the Coding endpoint with the general endpoint
https://open.bigmodel.cn/api/paas/v4.
Option B: Model resource packages / prepaid balance
- In the upper-right corner of the BigModel provider page, switch the connection mode to API Key
- Use the OpenAI protocol and set the OpenAI Base URL to
https://open.bigmodel.cn/api/paas/v4 - Fill in the API Key obtained from the Zhipu open platform
- Available models depend on your account permissions and the provider response; click Add Model to add other available models
Do not choose the Anthropic protocol for resource packages / prepaid balance. The Anthropic endpoint draws from balance only for accounts that have never purchased a Coding Plan and have received additional allowlisting; once an account has purchased a plan — whether used up or expired — it no longer bills against balance. Use the OpenAI general endpoint above instead.
Connect Z.ai
Z.ai is the connection option for overseas users, and the setup flow mirrors BigModel:
- Open the Model Settings panel through either method above
- Select Z.ai from the provider list on the left
- Connect your account and turn on the enable switch to use built-in models such as GLM-5.3 and GLM-5.3-Flash
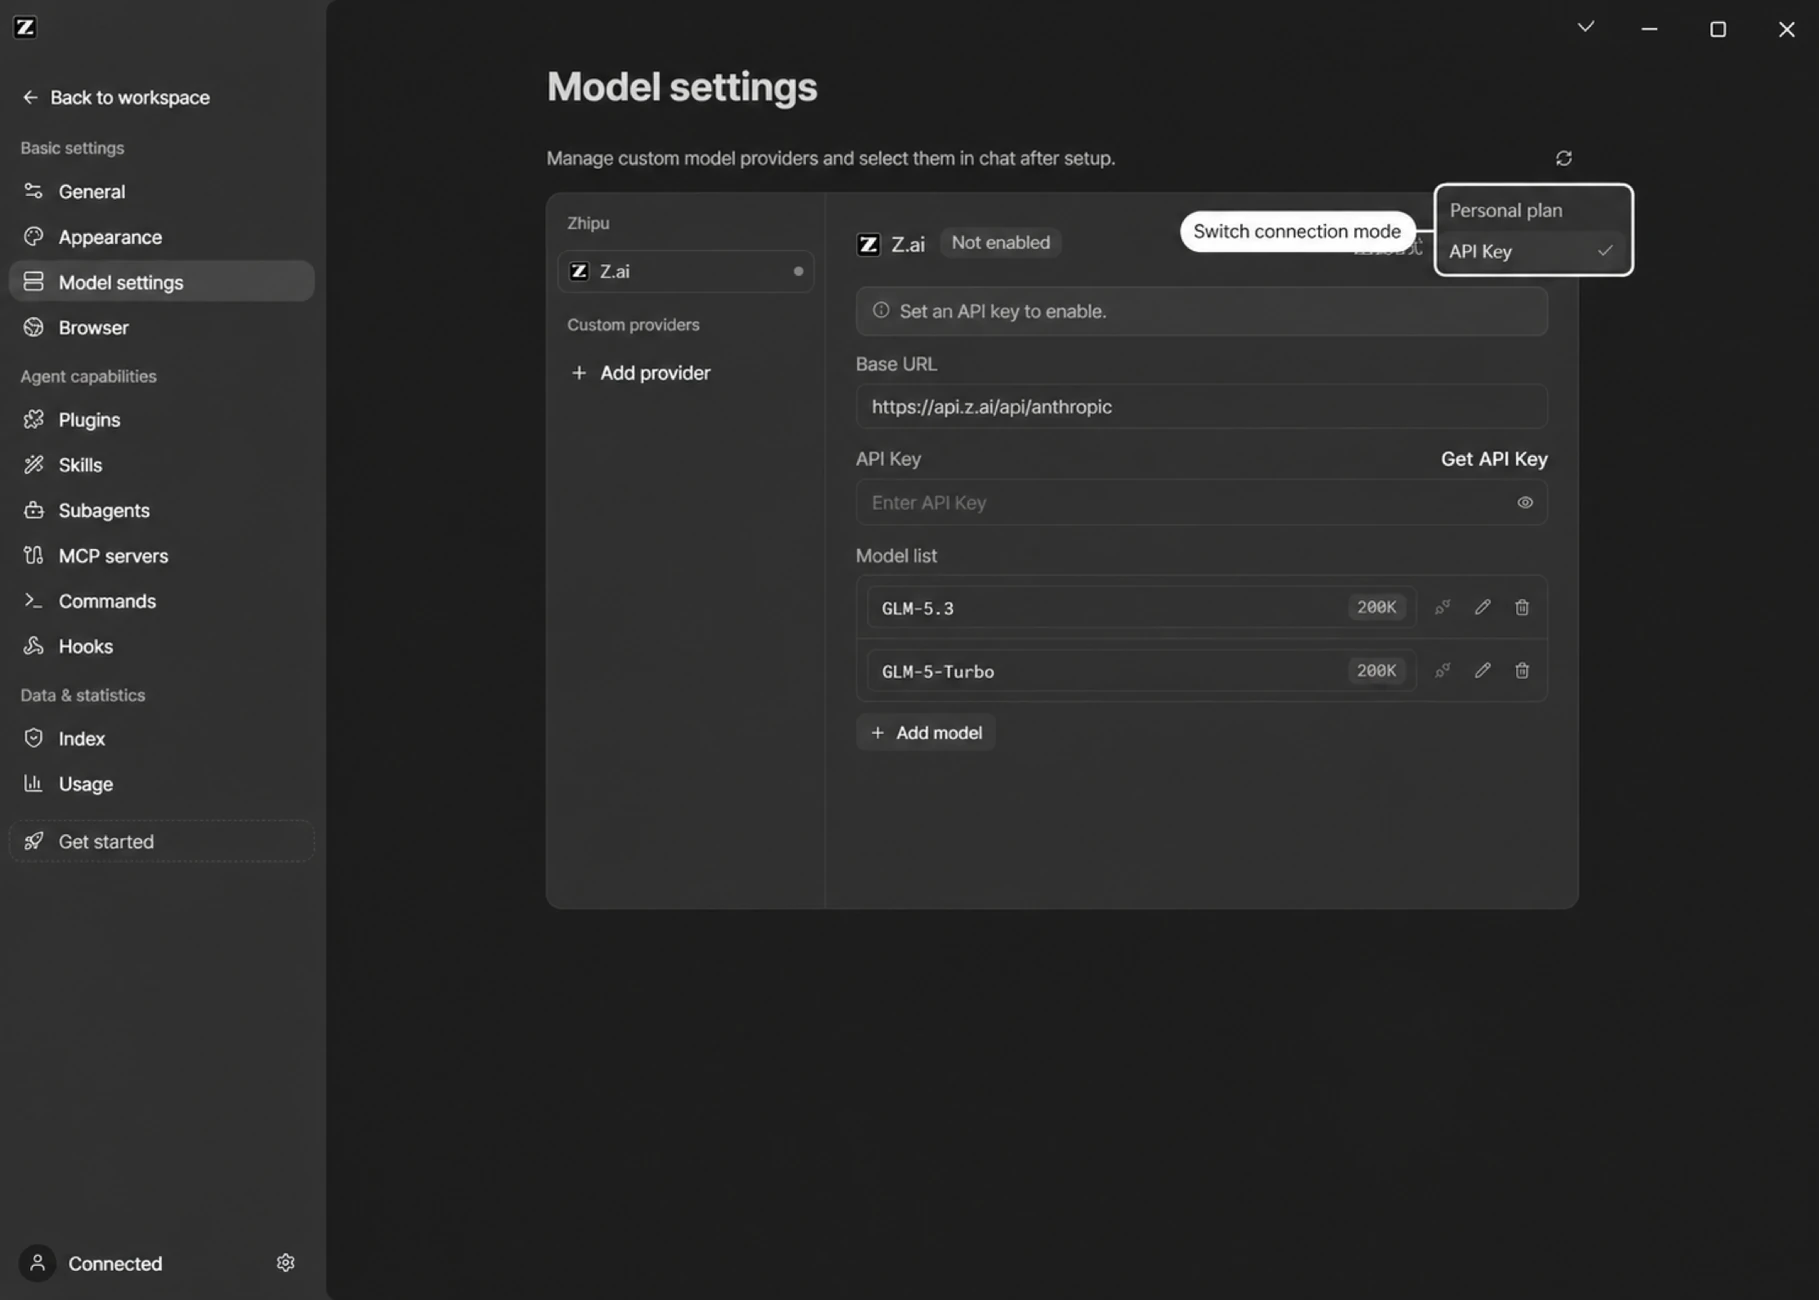
- The switcher in the upper-right corner also toggles between Coding Plan and API Key connection modes
Once connected, the provider page shows your current plan plus today's balance and usage per model:
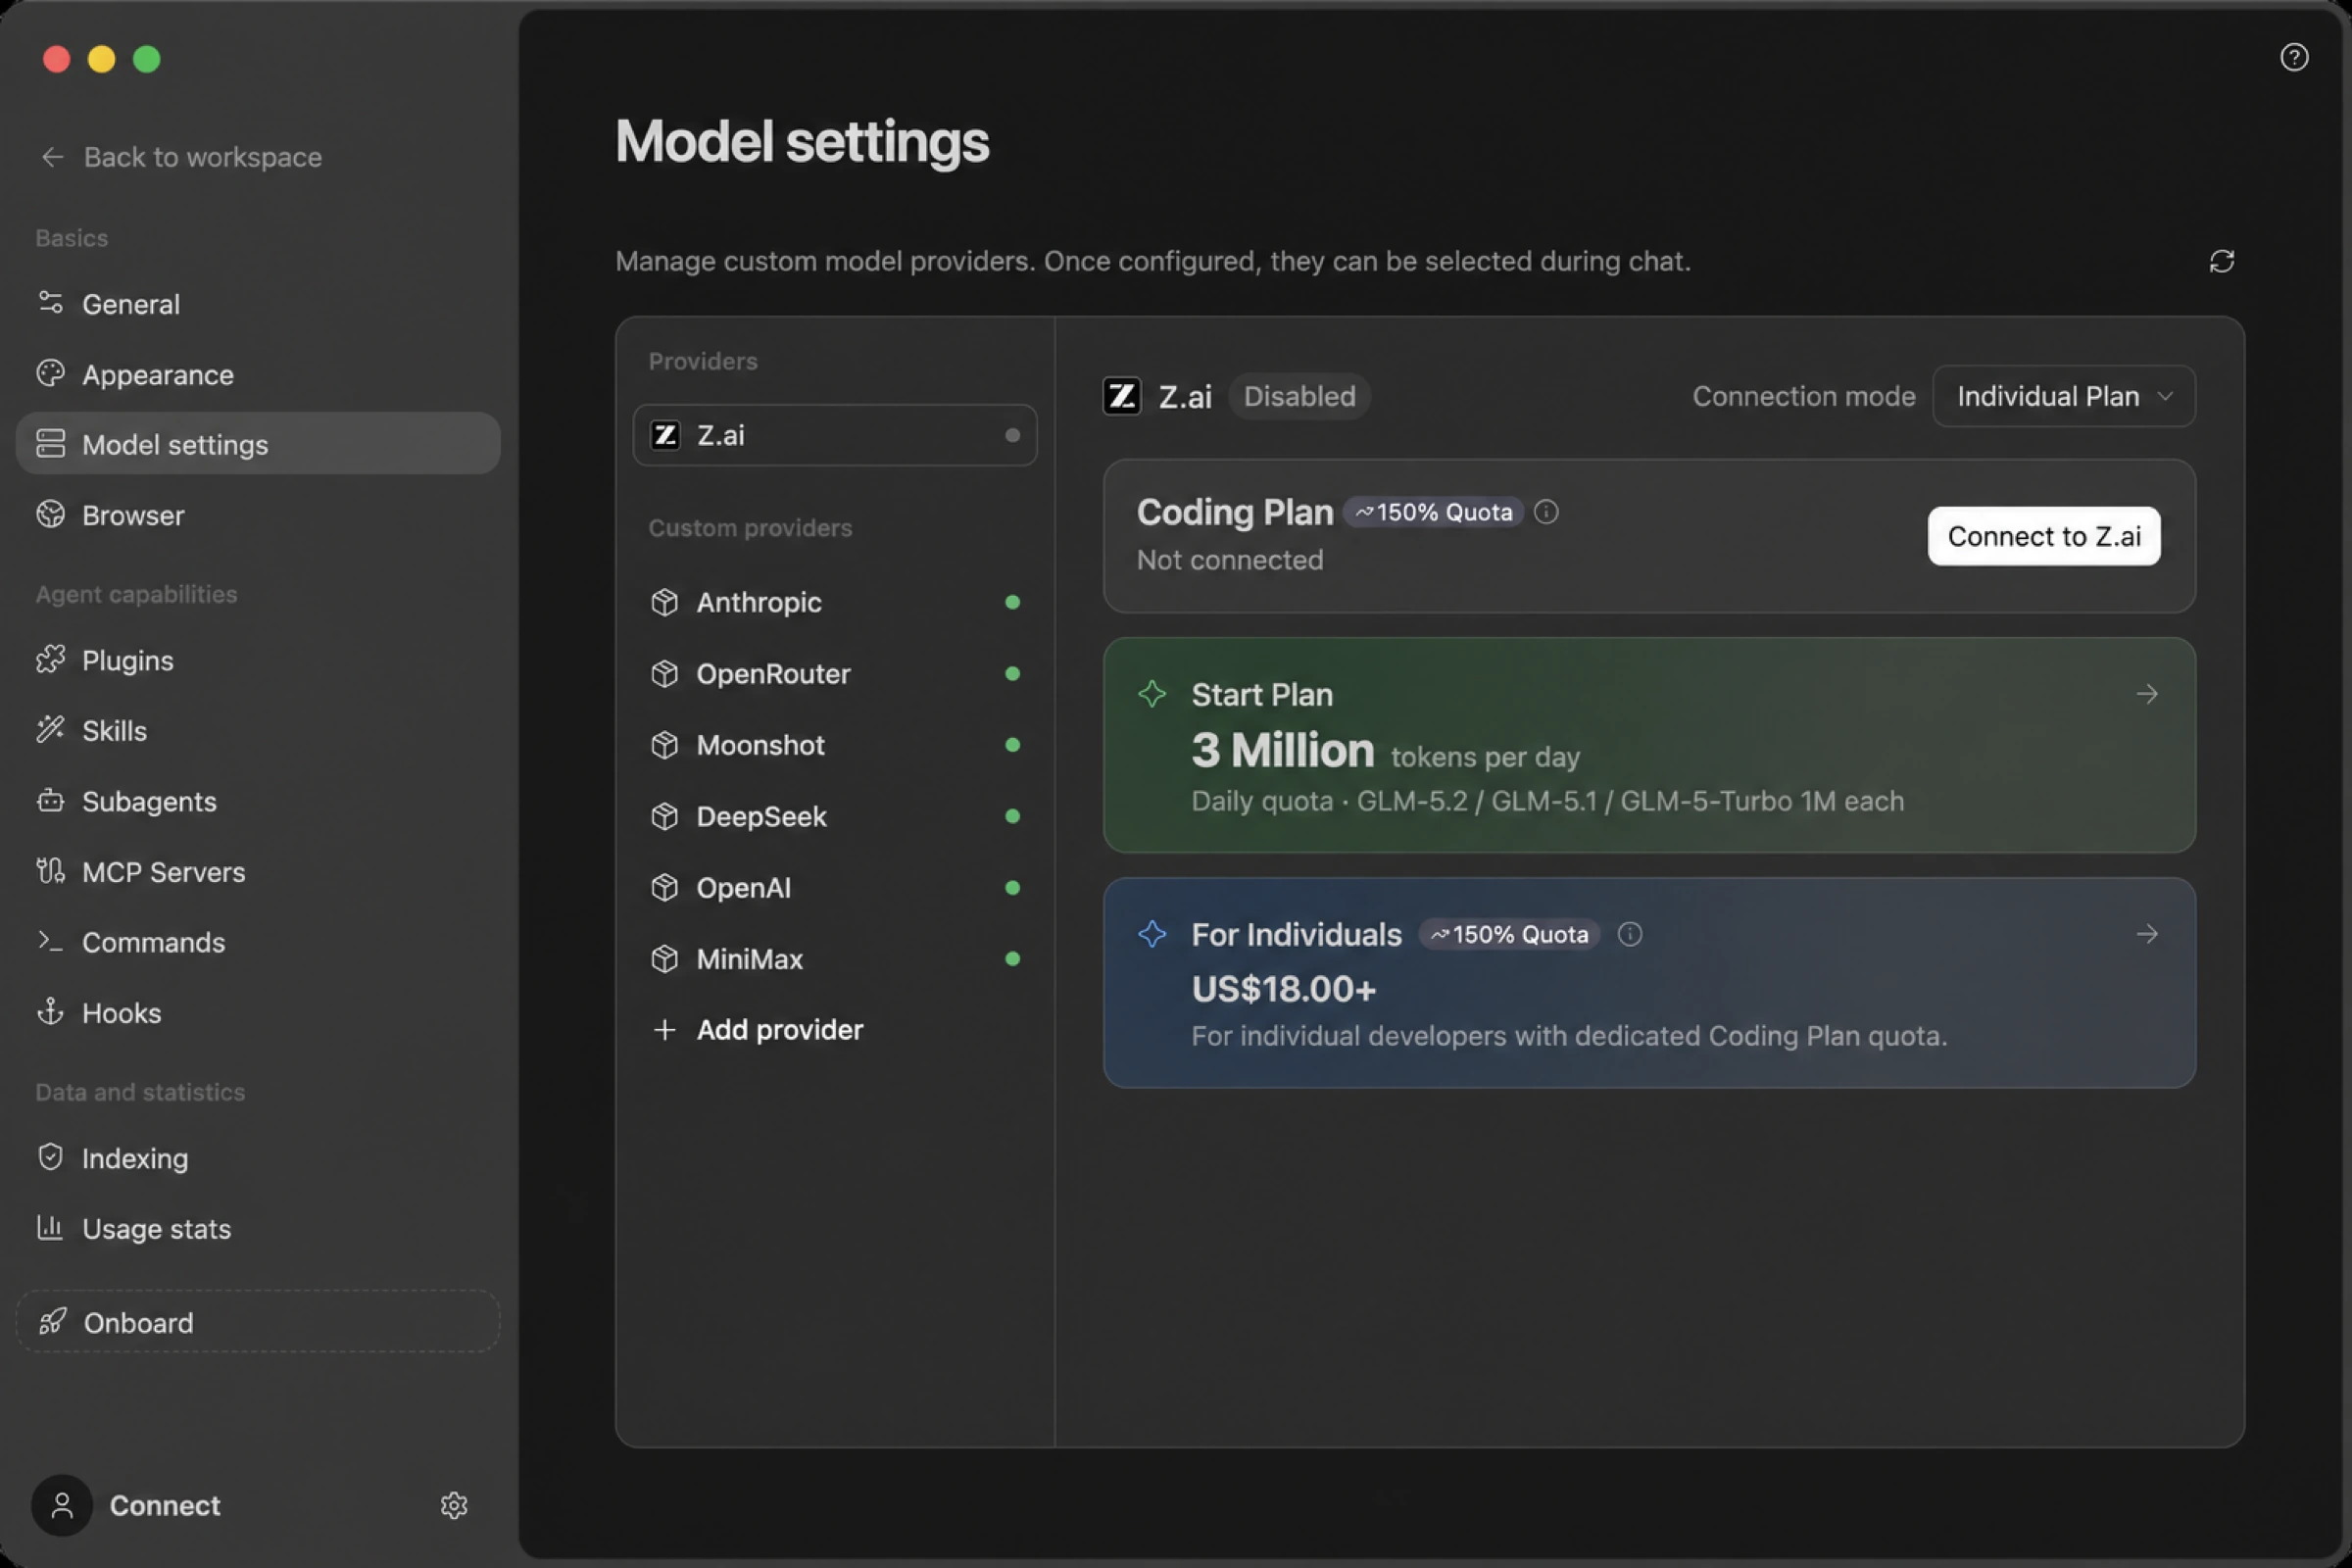
Trial Quota and Coding Plans
Just like BigModel, new users get a free daily trial quota for flagship GLM models, and you can browse and subscribe to the GLM Coding plans (Lite / Pro / Max, priced in USD) right on the page, with monthly, quarterly, and yearly billing. The new plans meter usage in credits and include a weekly allowance — see the Coding Plan Revision Notice for details.
Connect With an API Key
Choose the setup that matches your account type:
Option A: GLM Coding Plan (Coding Plan API Key)
- In the upper-right corner of the Z.ai provider page, switch the connection mode to API Key
- Set the OpenAI Base URL to the Coding-only endpoint:
https://api.z.ai/api/coding/paas/v4 - Fill in the API Key obtained from the Z.ai platform
- Available models depend on your account permissions and the model list returned by the provider
Do not replace the Coding endpoint with the general endpoint
https://api.z.ai/api/paas/v4.
Option B: Model resource packages / prepaid balance
- In the upper-right corner of the Z.ai provider page, switch the connection mode to API Key
- Use the OpenAI protocol and set the OpenAI Base URL to
https://api.z.ai/api/paas/v4 - Fill in the API Key obtained from the Z.ai platform
- Available models depend on your account permissions and the provider response; click Add Model to add other available models
Do not choose the Anthropic protocol for resource packages / prepaid balance. The Anthropic endpoint draws from balance only for accounts that have never purchased a Coding Plan and have received additional allowlisting; once an account has purchased a plan — whether used up or expired — it no longer bills against balance. Use the OpenAI general endpoint above instead.
Anthropic (Claude API)
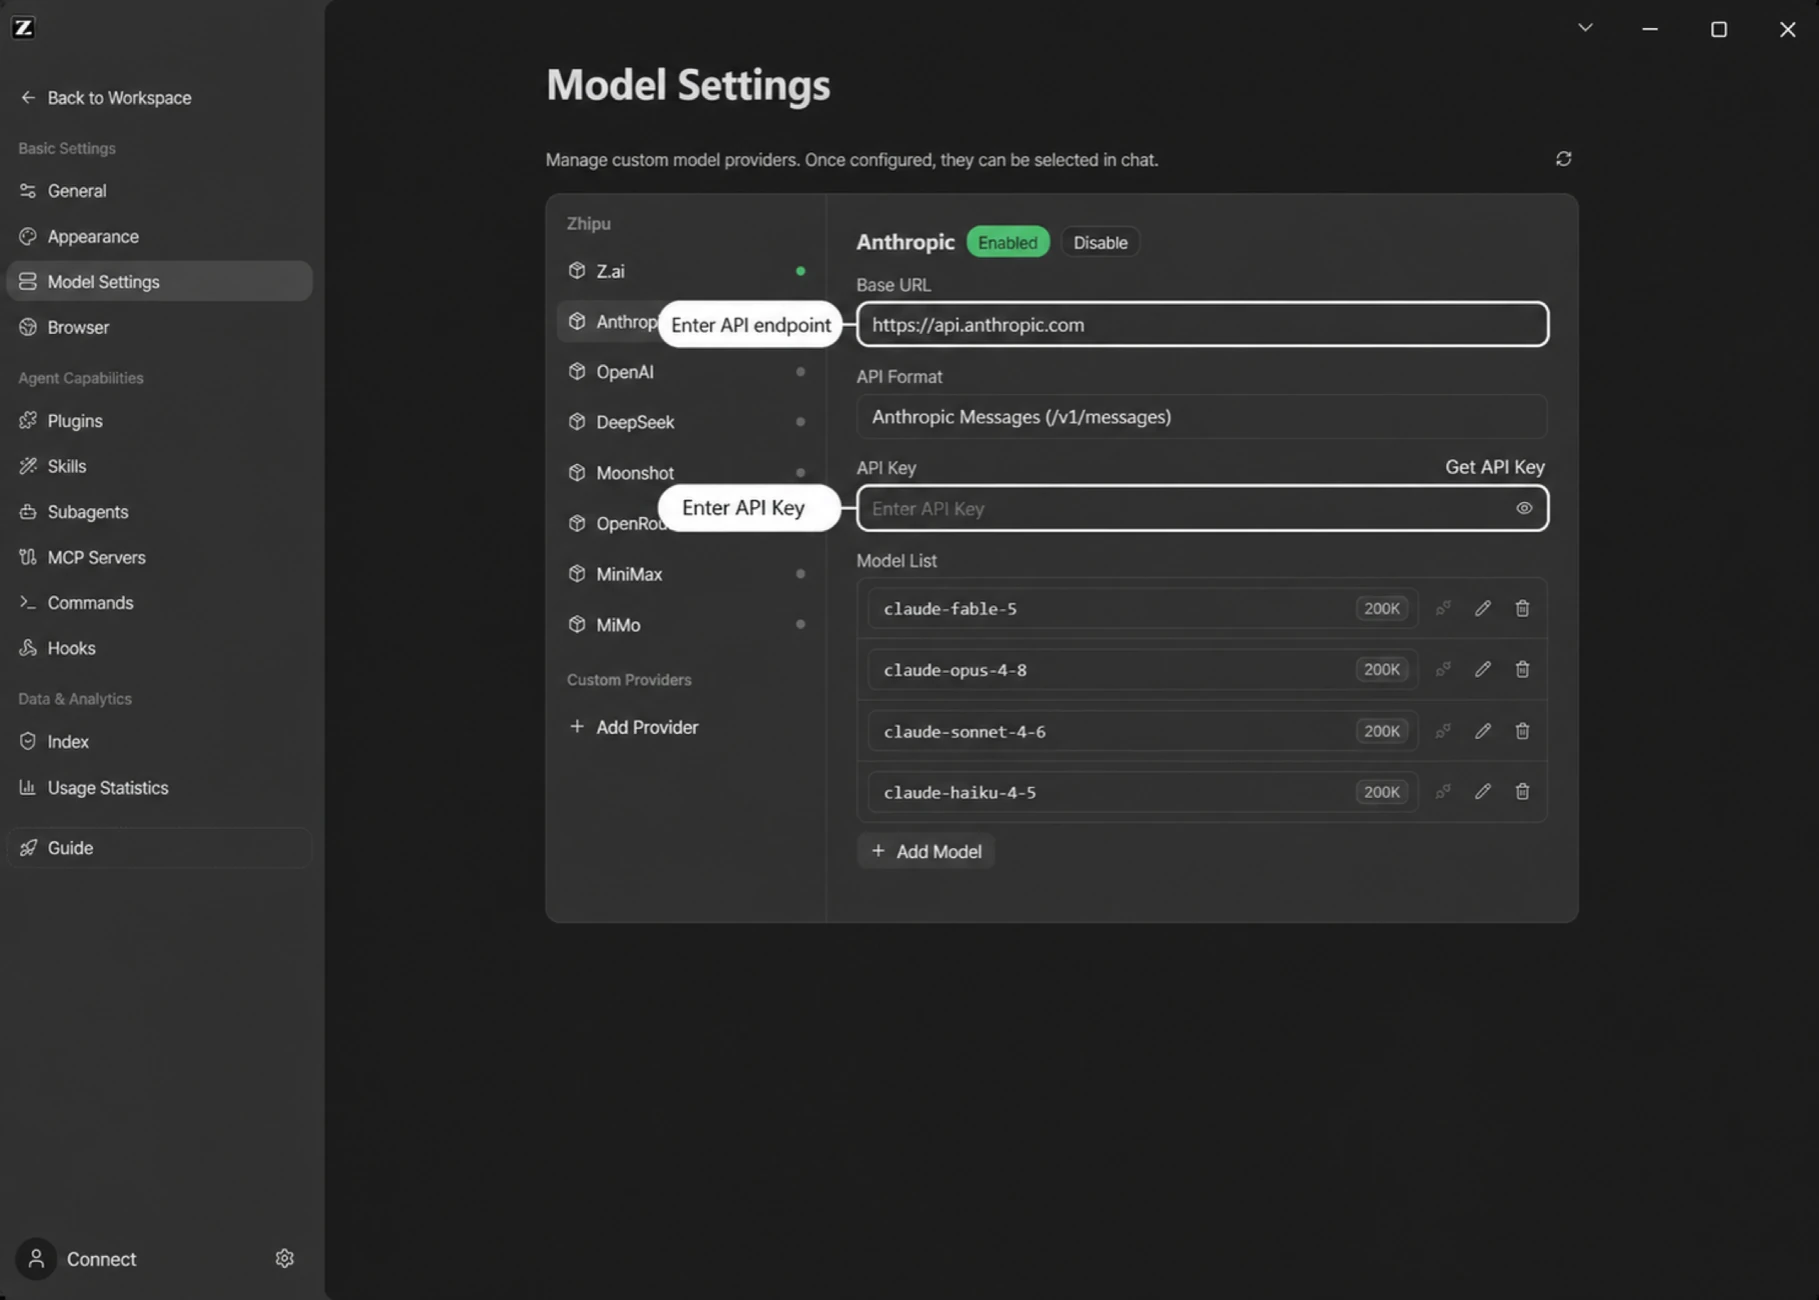
- Open the Model Settings panel through either method above
- Click Add Provider at the bottom of the provider list on the left
- Name it "Anthropic"
- Set the Anthropic endpoint to
https://api.anthropic.com - Fill in the API Key obtained from the Anthropic platform, where you can also check usage and plans
- After saving, click Add Model and enter the Anthropic model IDs you want to use
- Turn on the enable switch to start using it
OpenRouter
1. Create an API Key
Go to the OpenRouter platform, register an account, and create an API Key.
2. Configure in ZCode
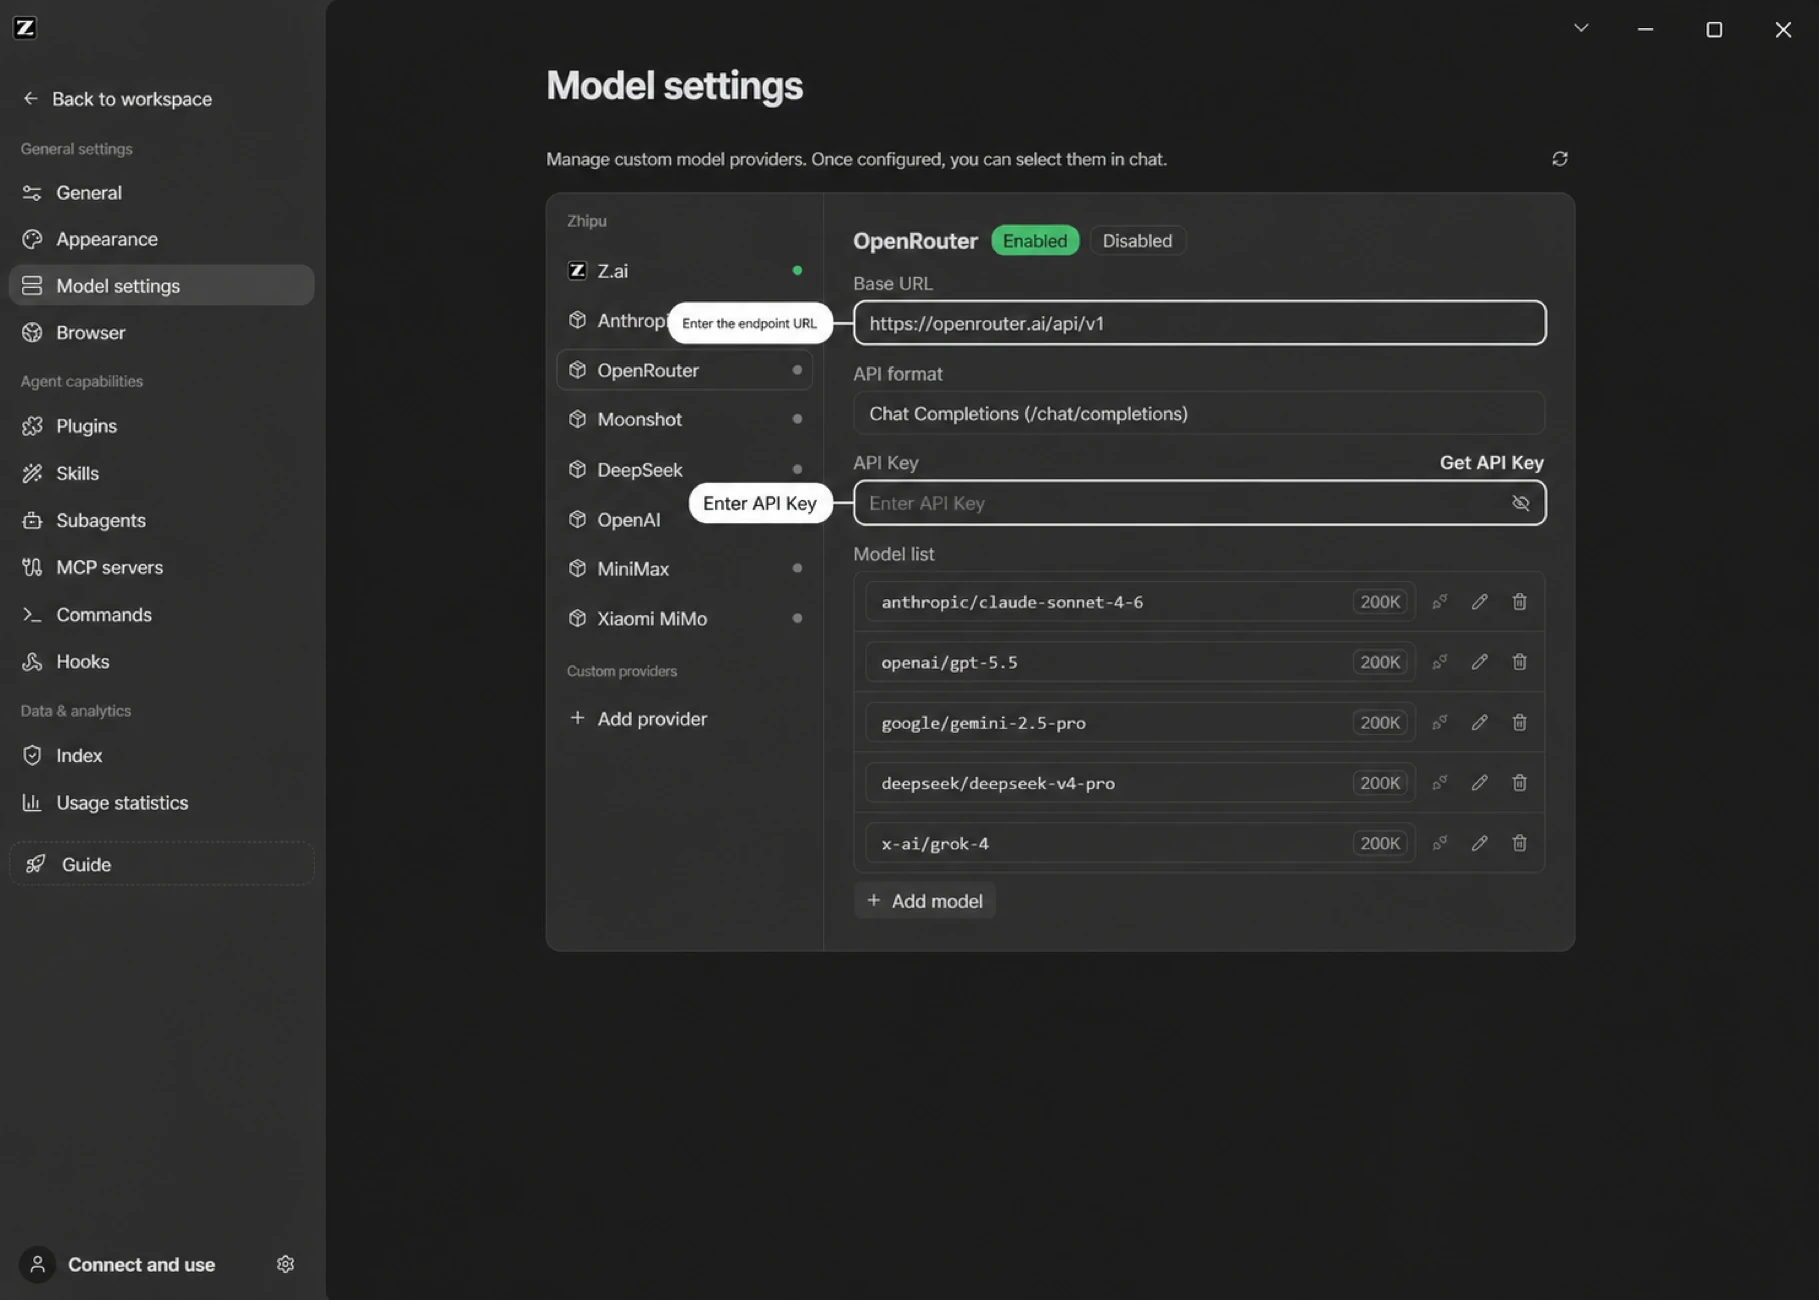
- Open the Model Settings panel
- Click Add Provider at the bottom of the provider list on the left
- Name it "OpenRouter"
- Set the API base URL to
https://openrouter.ai/api - Fill in the API Key
- Turn on the enable switch to start using it
Moonshot
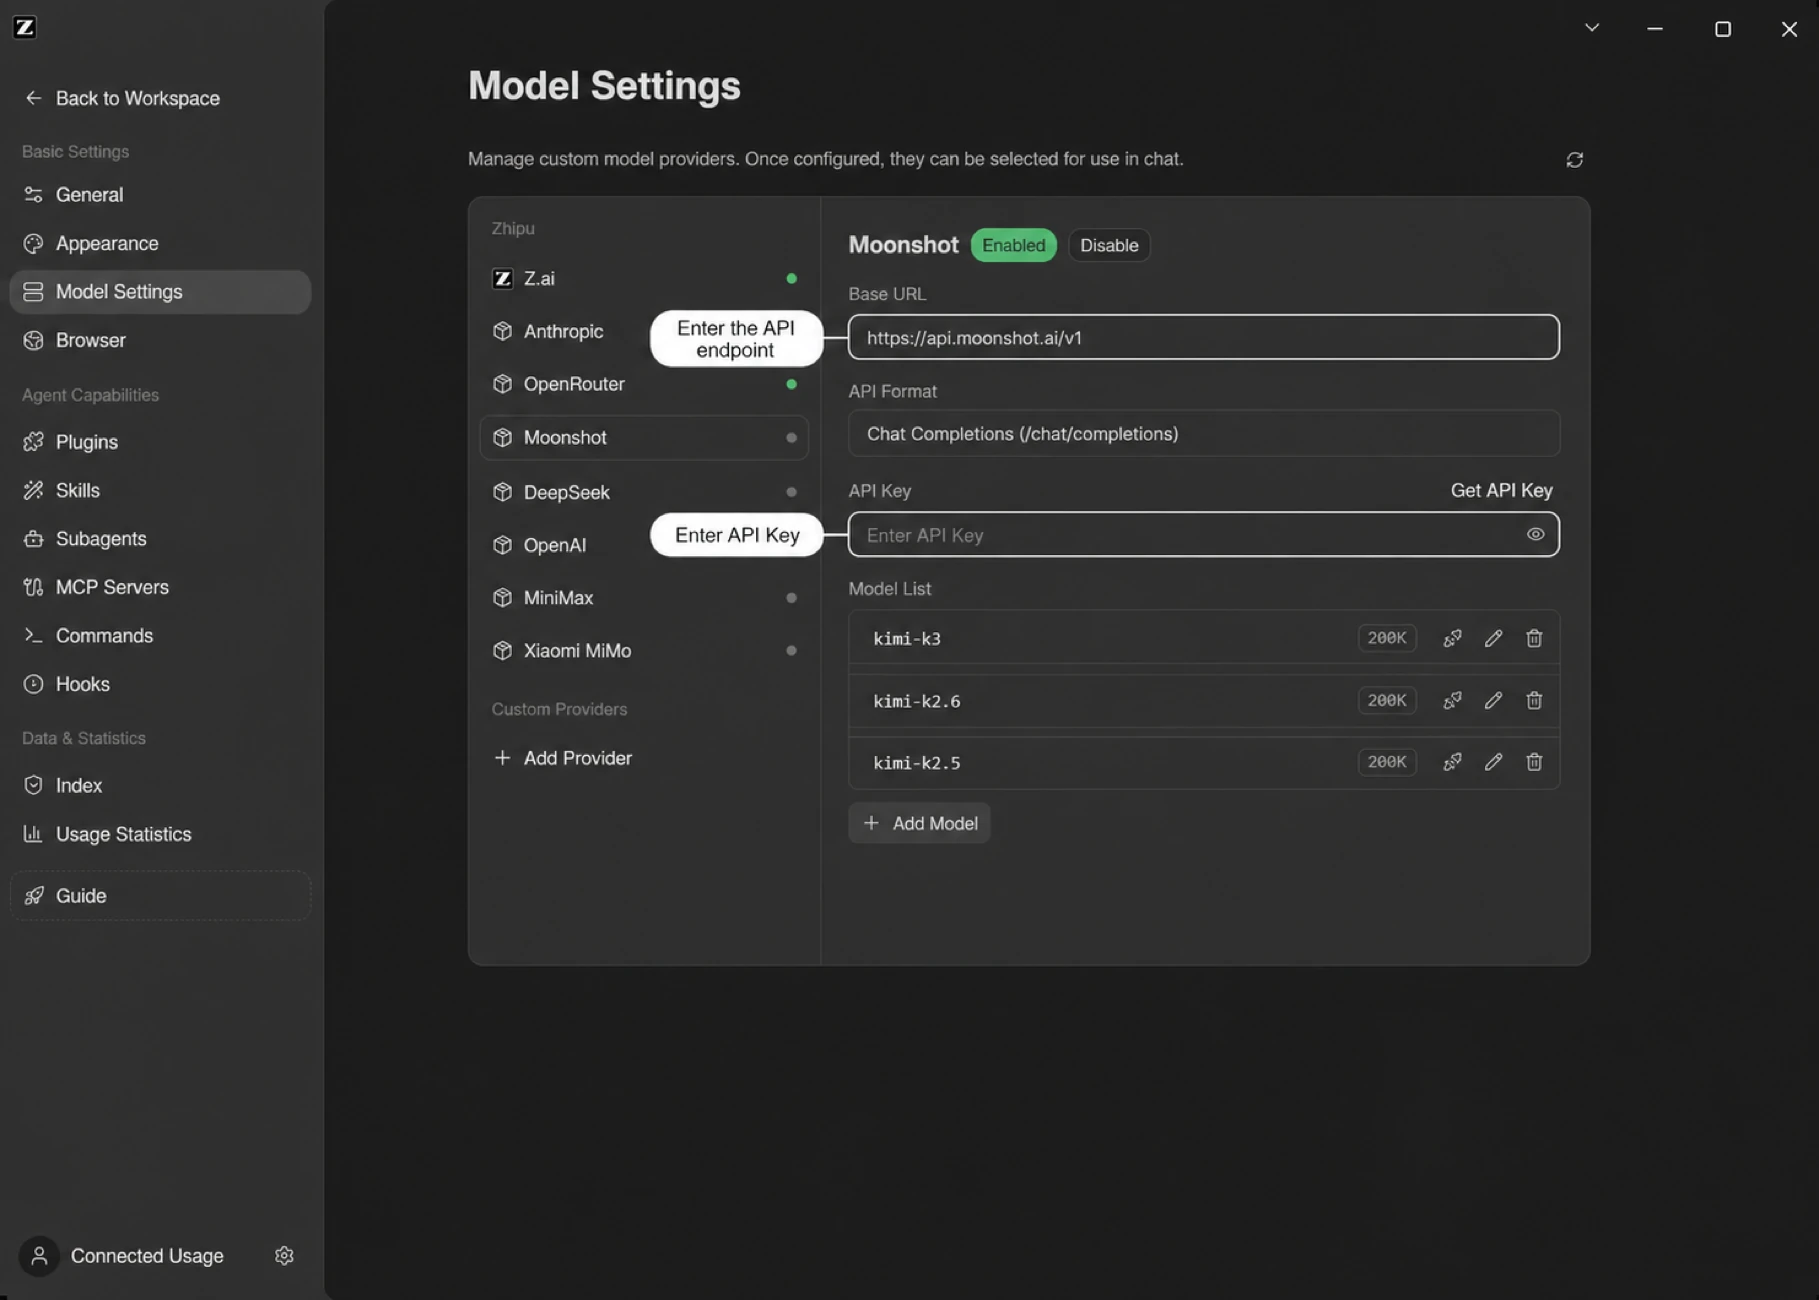
- Open the Model Settings panel
- Click Add Provider at the bottom of the provider list on the left
- Name it "Moonshot"
- Set the Anthropic endpoint to
https://api.moonshot.cn/anthropic - Get an API Key from the Kimi open platform (token packages and usage are available there) and fill it into the API Key field
- After saving, click Add Model and enter the Moonshot model IDs you want to use, then turn on the enable switch
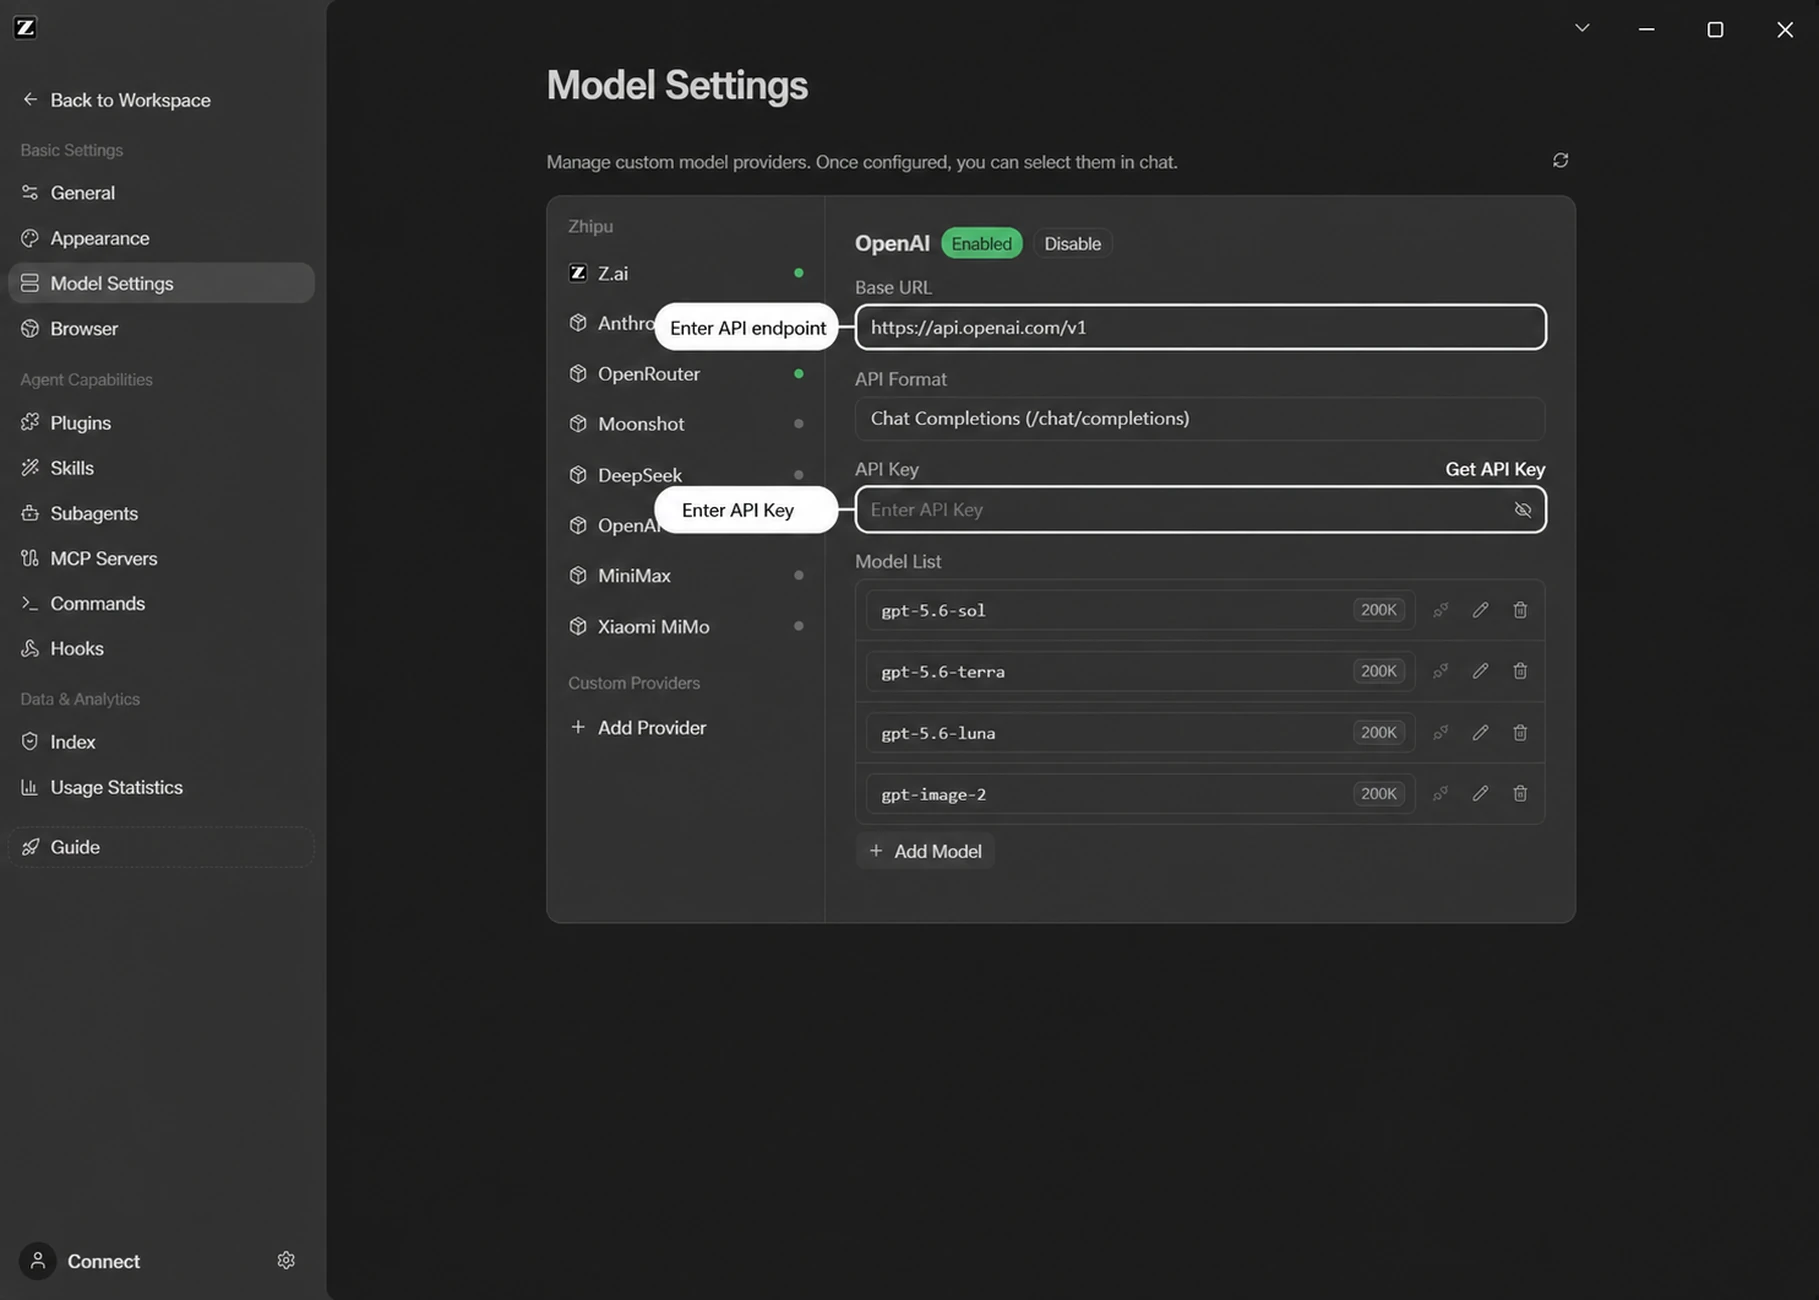
OpenAI
- Open the Model Settings panel
- Click Add Provider at the bottom of the provider list on the left
- Name it "OpenAI"
- Set the API base URL to
https://api.openai.com - Fill in the API Key obtained from the OpenAI platform
- After saving, click Add Model and enter the OpenAI model IDs you want to use, then turn on the enable switch
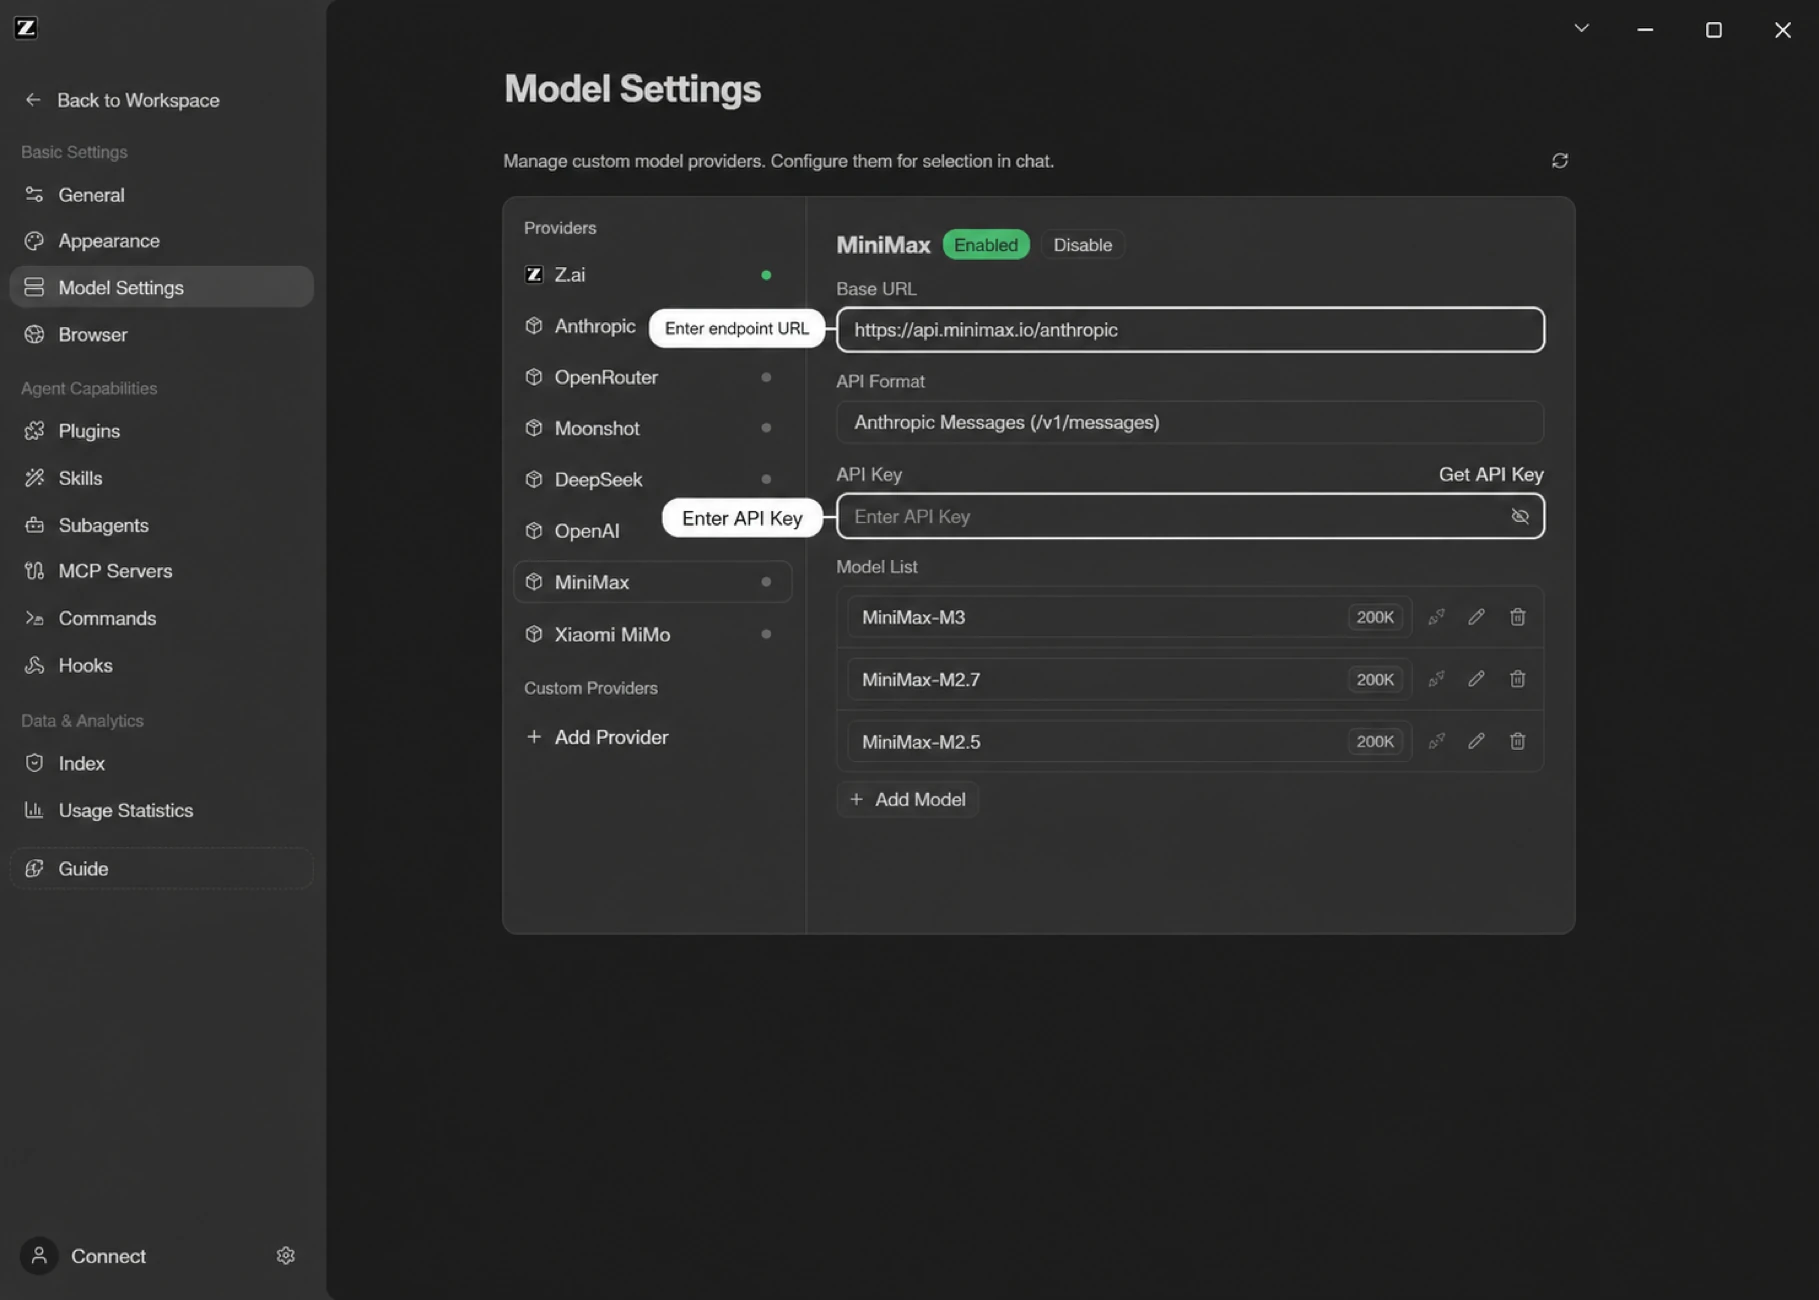
MiniMax
- Open the Model Settings panel
- Click Add Provider at the bottom of the provider list on the left
- Name it "MiniMax"
- Set the Anthropic endpoint to
https://api.minimaxi.com/anthropic - Get an API Key from the MiniMax open platform (plans and billing are available there) and fill it into the API Key field
- After saving, click Add Model and enter the MiniMax model IDs you want to use, then turn on the enable switch
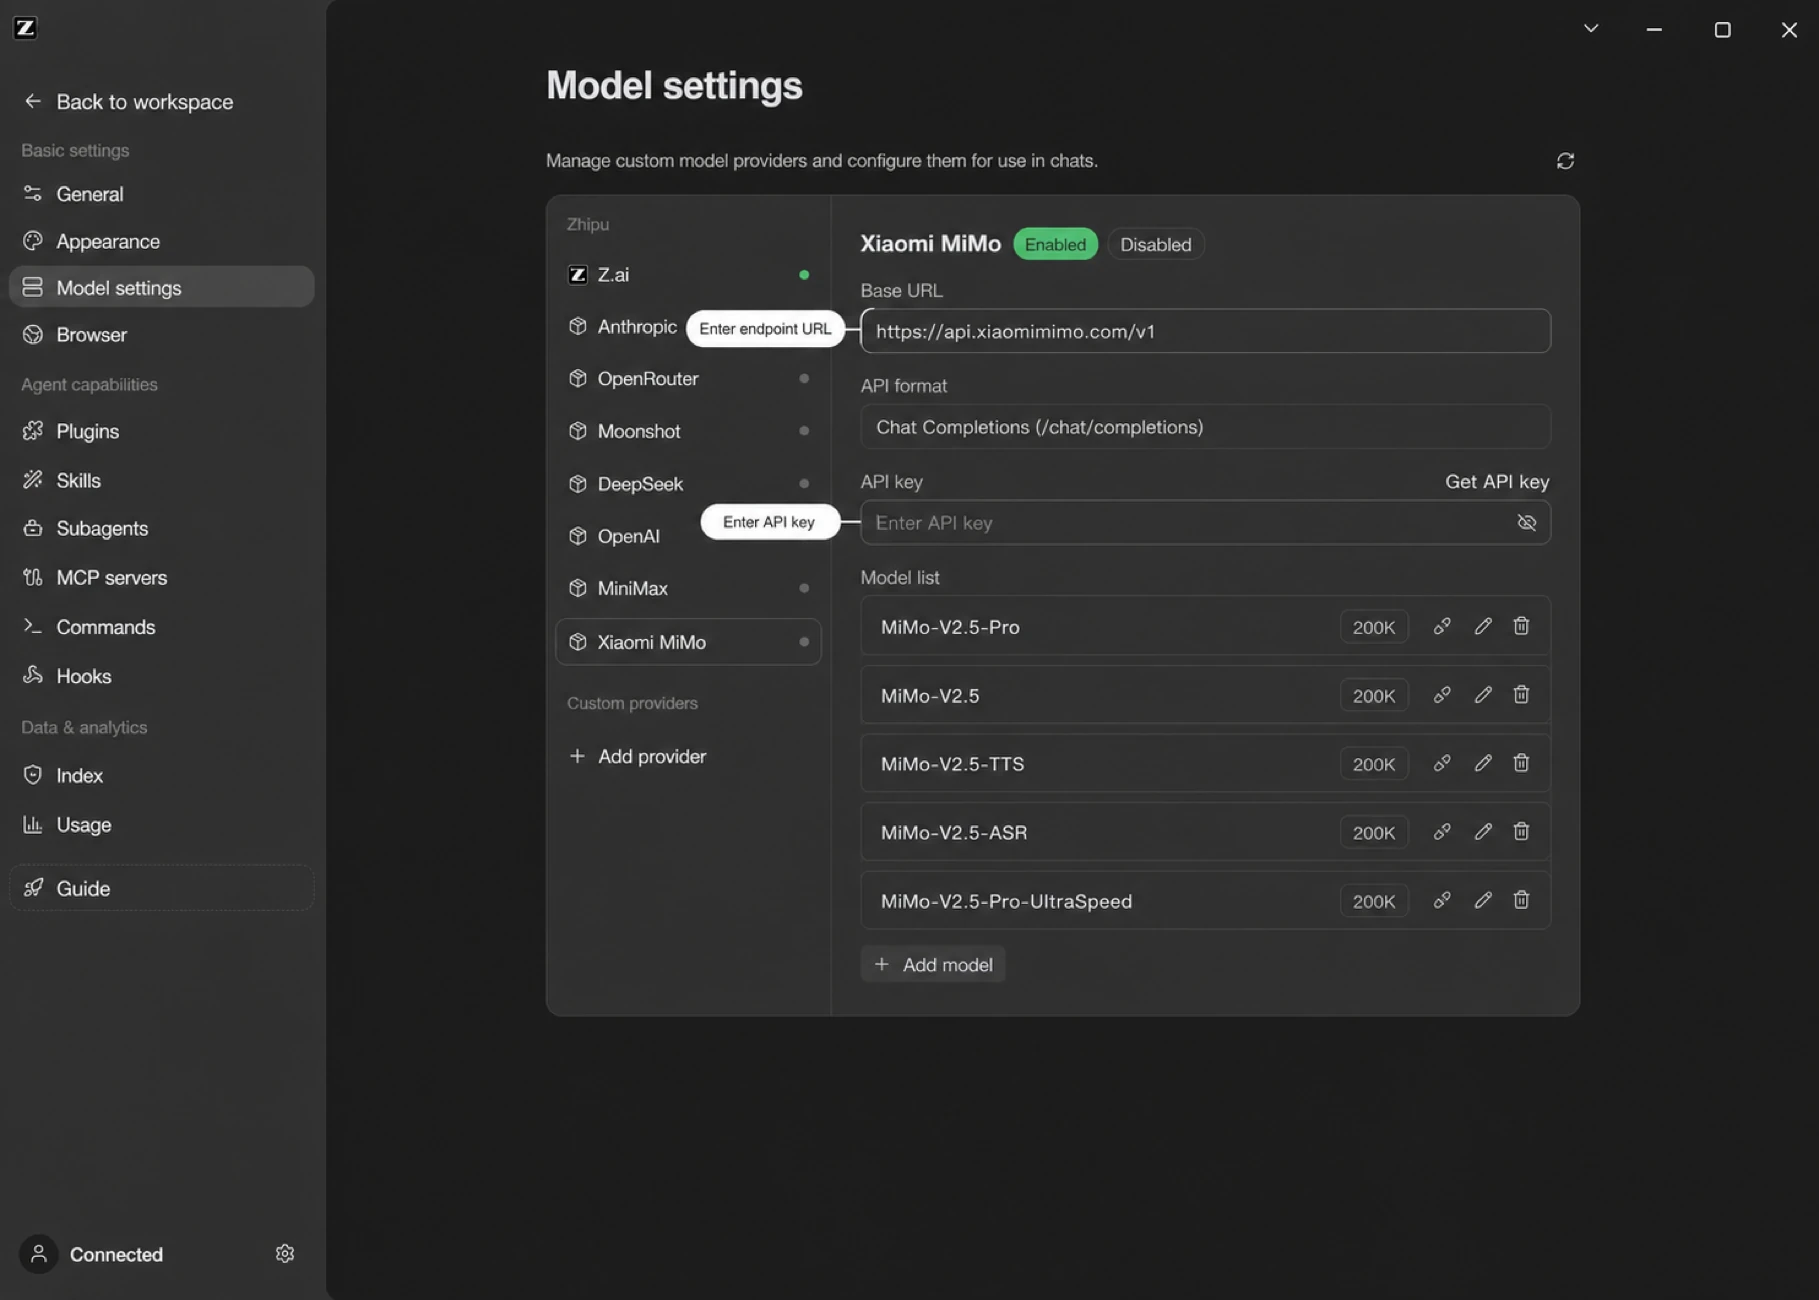
Xiaomi MiMo
- Open the Model Settings panel
- Click Add Provider at the bottom of the provider list on the left
- Name it "Xiaomi MiMo"
- Set the API base URL to
https://api.xiaomimimo.com/v1 - Get an API Key from the Xiaomi MiMo open platform (Token Plan packages are available there) and fill it into the API Key field
- After saving, click Add Model and enter the Xiaomi MiMo model IDs you want to use, then turn on the enable switch
Custom Providers (Anthropic / OpenAI Compatible)
ZCode can add any model service compatible with the Anthropic / OpenAI protocols as a custom provider — public model services, team-managed enterprise channels, or self-hosted services on a private network.
After entering the endpoint and API Key, click Add Model and enter the model IDs supported by that service to start using it.
Setup Steps
- Open the Model Settings panel
- Click Add Provider at the bottom of the provider list on the left
- Name the provider (e.g. claude, deepseek)
- Choose the vendor Base URL from the dropdown, or enter the API base URL manually
- Fill in the API Key for the service
- Add models: click Add Model and enter the model IDs supported by the service
- Turn on the enable switch to start using it
Taking the DeepSeek-compatible endpoint as an example:
- Name it "DeepSeek"
- Set the Anthropic endpoint to
https://api.deepseek.com/anthropic - Set the OpenAI endpoint to
https://api.deepseek.com/v1 - Fill in the API Key obtained from the DeepSeek open platform
- Click Add Model and enter the DeepSeek model IDs (e.g.
deepseek-chat,deepseek-reasoner) or the model IDs agreed on by your team - Click save

Team usage tip: for enterprise model channels, manage the Base URL, API Key, model list, and access policy at the team level so long-running tasks have a stable and traceable model connection. For team-level seats, usage, and permission management, see the GLM Coding Plan Team edition.
Per-Model Advanced Settings
Open a model under Settings → Model Providers and expand Advanced to set Max output tokens for that one model — the length limit for a single reply.
Leave it empty and ZCode uses whatever the model itself supports, which is the right choice almost always. Set it only if you know a particular model handles longer replies than it reports.
One thing to expect if you do raise it: output length and conversation history compete for the same space, so a higher limit means ZCode compacts long conversations sooner.
Context Window: What You Can and Can't Change
The same Advanced panel shows the model's context window. Three kinds of models behave differently:
- Custom-provider models: editable; the new value applies to new sessions after saving.
- Coding Plan / Start Plan built-in models: the context window is issued by the server. Local edits are restored to the official value on the next sync — that's by design, not lost configuration.
- Models whose name ends in
[1m]: fixed at a 1M context, not editable.
Automatic context compaction triggers before the window is actually full: the system reserves room for model output plus a safety buffer (about 34K tokens combined), so compaction below the nominal window size is expected — a 128K window compacts around 94K tokens, a 1M window around 966K. There is currently no user-facing switch or threshold for automatic compaction. Also note the per-item breakdown in the context meter is a local estimate with a different basis than the total at the top — the two don't add up exactly.
Thinking Effort and Third-party Deployments
ZCode shows the thinking-effort levels supported by the current model. The available levels vary by model:
| Model | Available levels | Default |
|---|---|---|
| GLM-5.3 | low / high / max | max |
| GLM-5.2 | nothink / high / max | max |
| GPT series | low / medium / high / xhigh | medium |
| Claude series | low / medium / high / xhigh (Opus 4.7 also supports max) | medium |
Kimi K3 (kimi-k3 / k3 / k3-256k) | low / high / max | max |
| DeepSeek V4 series | high / max | max |
| Other custom models | a simple on/off toggle, or no levels at all | Defined by the model configuration |
The UI sorts these choices from lower to higher effort. ZCode then converts the selected level for the target API: OpenAI-compatible endpoints use the top-level reasoning_effort field, while Anthropic-compatible endpoints use thinking / effort. If a third-party model does not show fine-grained levels, ZCode usually does not have a known level mapping for that model; the setting has not been lost.
Be aware that a third-party deployment of the same model may accept different levels than the official endpoint. For example, ZCode sends max for the top level of the DeepSeek V4 family, matching the official endpoint — but some third-party deployments only accept up to xhigh, so the top level returns a 400 parameter error there. Picking high instead works fine. Non-V4 DeepSeek models use a simple on/off toggle by default and do not use the high / max levels shown above.
Provider-specific thinking parameters: enable_thinking for the Qwen family and thinking.type=enabled/disabled style toggles are supported; GLM's clear_thinking and MiniMax's adaptive thinking mode cannot currently be configured in ZCode. Adding custom request parameters for third-party models is not supported yet either: in ~/.zcode/v2/config.json, a provider's options only recognizes connection settings such as apiKey, baseURL, apiKeyRequired, and headers; any other keys added by hand (e.g. reasoning_effort, vl_high_resolution_images) are silently ignored and never written into the request body.
How Image Support Is Decided
ZCode determines whether the selected model can receive images using the provider and model configuration, capability data from the model catalog, built-in model rules, and the active API protocol. The result has three possible states:
- Supported: the image is retained and sent to the model service.
- Unsupported: the image data is removed before the request is sent and replaced with a text notice, so unsupported media does not reach the model service.
- Unknown: ZCode does not block the image in advance. The model service makes the final decision, and the request may fail if that endpoint does not accept images.
When BigModel / Z.ai is connected through a Coding Plan, the built-in GLM-5.3-Flash is a multimodal model for screenshot understanding, image analysis, and visual Q&A: with it selected, images are treated as Supported and sent through with no extra configuration.
The model ID is part of capability matching, but it is not the only input. The same GLM model can produce a different result when connected through a different provider or API protocol. For example, when GLM-5.2 is connected through an official Anthropic-compatible endpoint, ZCode can retain the image and let the service handle it. Through an OpenAI Chat-compatible endpoint, the model is treated as not supporting image input. For suffixed variants such as glm-5.2-highspeed, ZCode also considers the provider, API protocol, and any explicit capability configuration; image support cannot be inferred from the model name alone.
If an image request fails, first use the canonical model ID documented by the provider and verify that the selected endpoint supports image input. For a custom model or third-party deployment, explicitly declare its image capability in the model configuration. If support cannot be confirmed, avoid sending images with that model.
What the HTTP Proxy Covers
The HTTP proxy in Settings is not a system-wide proxy. It covers the following traffic:
Proxied: model API requests, MCP servers (stdio / HTTP / SSE transports), WebFetch page fetching, terminal command subprocesses (via injected HTTP_PROXY variables), the plugin marketplace, and in-app page loading.
Not proxied: desktop account sign-in and backend service requests, repo Wiki generation, the Web Remote Control channel (WebSocket), and SSH remote connections.
Two things to note:
- ZCode does not read the system
HTTP_PROXY/HTTPS_PROXYenvironment variables by default (only WebFetch falls back to them when no proxy is configured) — the proxy set in Settings is the source of truth. - After changing the proxy setting, restart ZCode for it to take effect across all traffic.
Verify The Setup
After configuration, choose the channel from the model selector in the chat box and send a short test instruction. Once the model responds reliably, you are ready to go.